Overview & concept
VIIY is a media server for video installations and live shows. Content is built in the CUE EDITOR as layers on a timeline, stored as cues (a cue = a snapshot of all layers), and played out through SHOW to the physical screens configured in OUTPUTS. Live sources (cameras, DeckLink, NDI, Spout) are routed on the MATRIX tab.
Made by a practitioner. VIIY comes from years of running real shows — the ideas that proved themselves on site kept, the friction removed. The result is one focused tool that does exactly what a show needs, and nothing it doesn't: edits go live, the outputs are frame-accurate, and a backup machine stands ready to take over. Powerful where it matters, simple everywhere else.
PROGRAM-FIRST — the core of the workflow
- The editor is in PROGRAM mode by default: every edit goes to the screens live. Drop a file into a fresh project and it is on the preview and physical outputs immediately (a freeze-frame, no Play needed).
- EDIT is a manual sandbox: you prepare the next cue in the background while the on-air program keeps running untouched. + New cue while the program is playing switches the editor to EDIT automatically.
- Two program decks A/B: GO brings a cue onto the free deck with a transition (Cut / Crossfade / Wipe); the old deck stops.
Interface colour legend
| Colour | Hex | Meaning |
|---|---|---|
| Blue | #2f8df5 | accent, active state, progress |
| Green | #27c264 | LIVE, playing, GO, enabled |
| Amber | #e0b020 | test card, SOLO, User Guides, warning |
| Red | #c0504a | error, BLACKOUT, delete |
| White | #ffffff | selected slice (frame + veil) — selection only |
The monospace font is Consolas (timecodes, numbers). Panels are divided by draggable splitters (hover = grey, press = blue); the layout is remembered in the workspace.
Quick start — from documents to a running show ⭐
There are two ways to build a show in VIIY. This chapter is the short one: hand your production documents to the AI Showbuilder and let it lay the show out for you. Building the same show by hand — canvas, outputs, slices, cues, layers — is the long way, and every step of it is described in OUTPUTS and CUE EDITOR.
1 · Connect the key, then prepare the documents
Paste your Anthropic API key once — the 🔑 API key control sits at the bottom of the AI ASSISTANT tab, under the input box (not in SETUP). Everything after that depends on what you feed it. The Showbuilder is only as precise as your paperwork, so gather:
- a stage design sketch and the technical setup of the LED screens — from these VIIY builds the output mapping and the main composition;
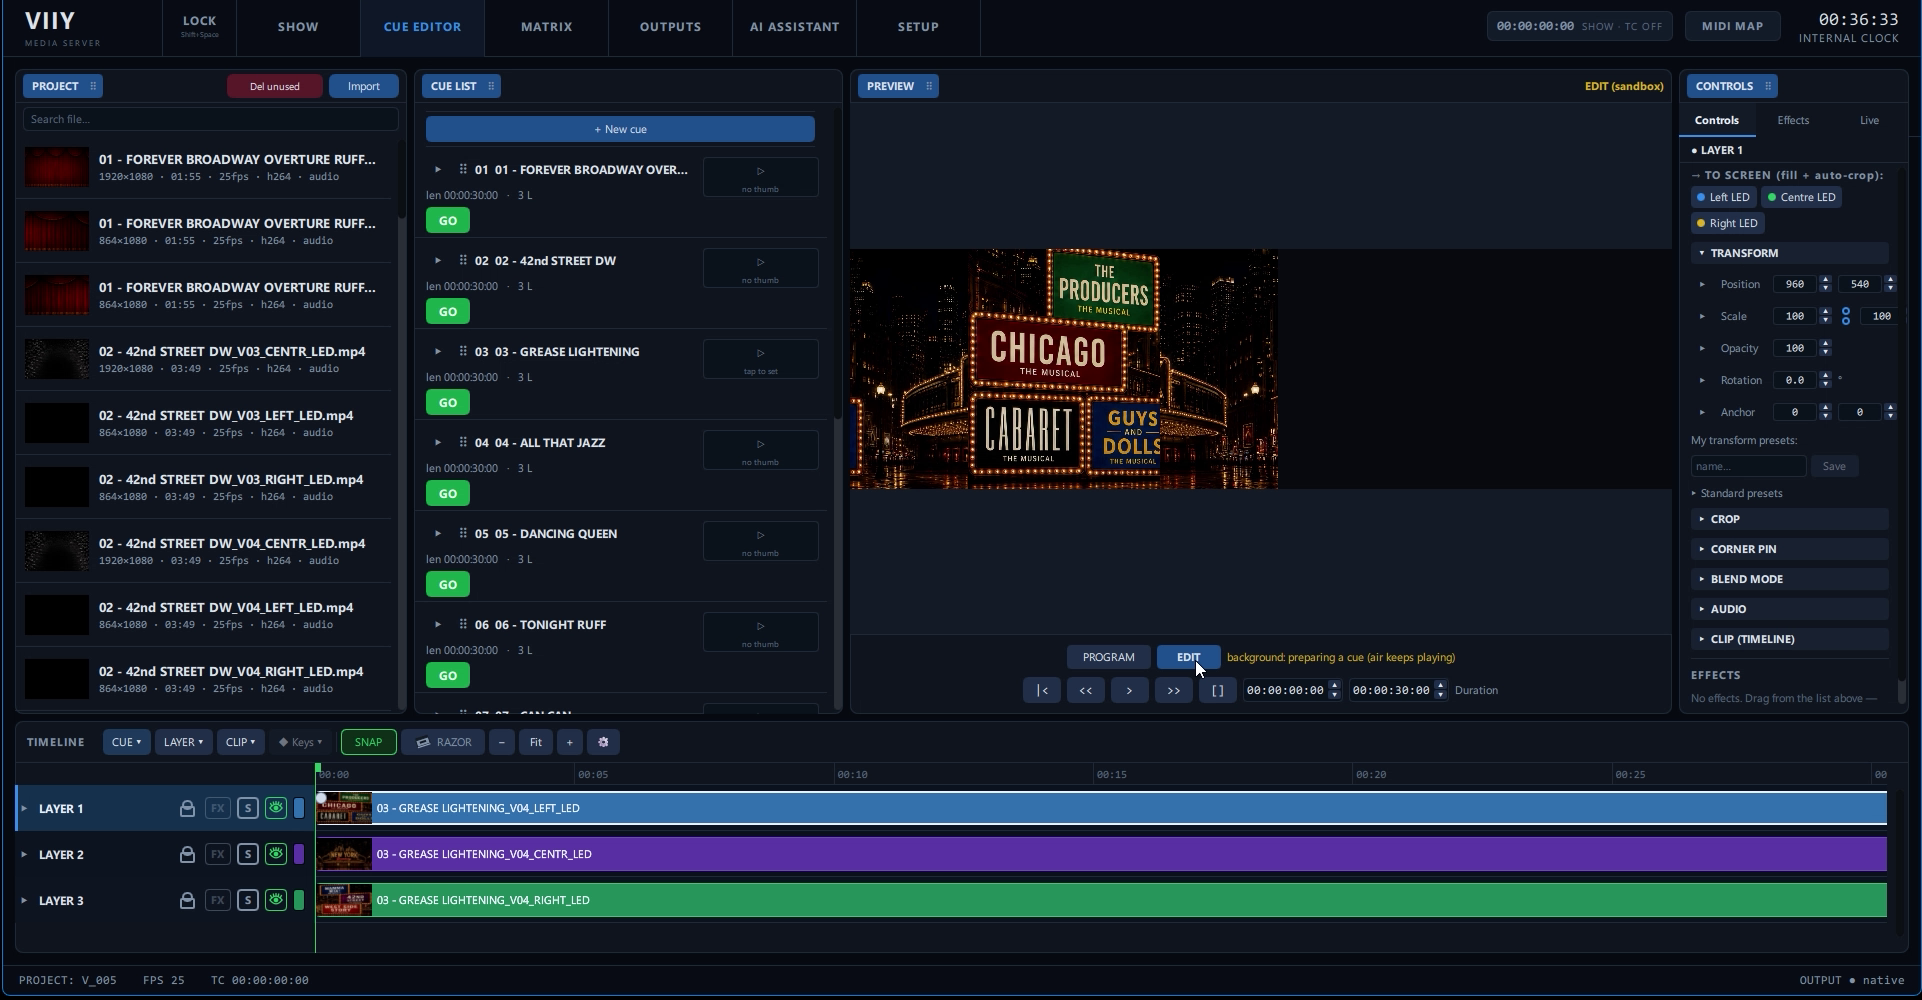
- a file with the timecode and the running order of songs or scenes — from this it creates the cues, puts them in order and writes the timecode into each one;
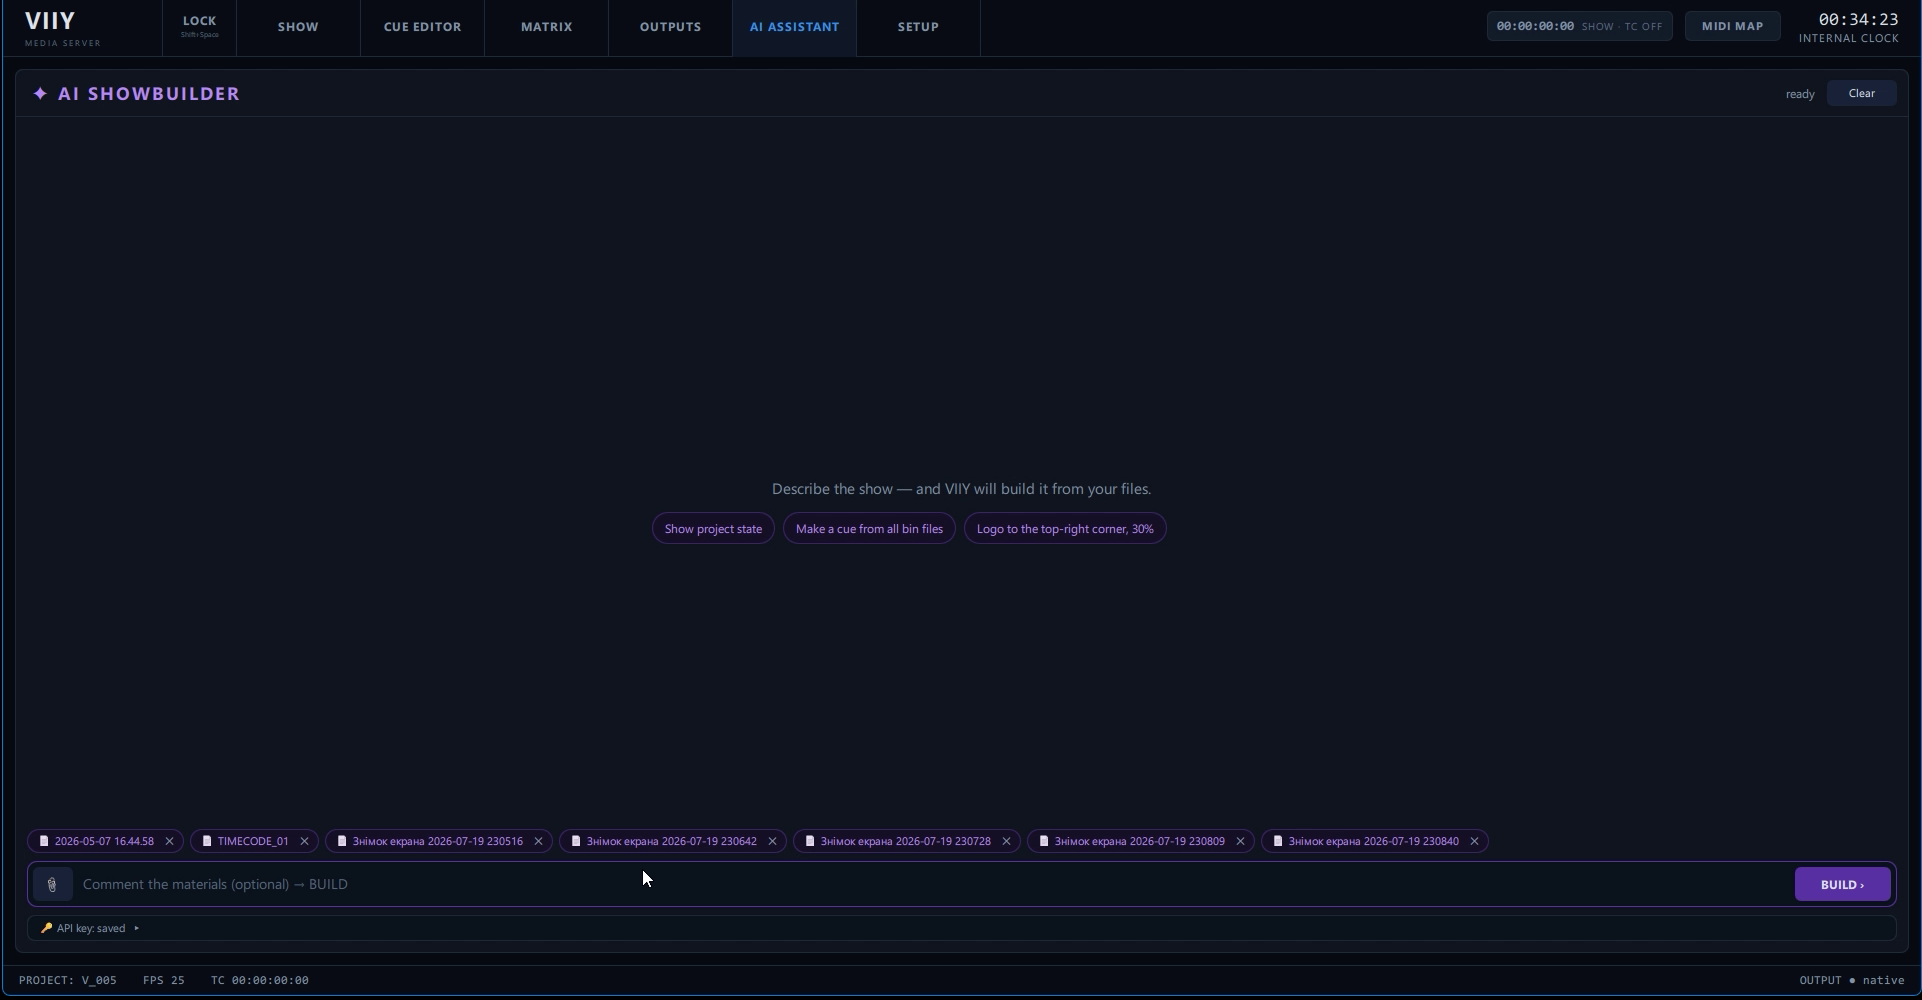
- your video files, if you already have them. If a file name contains the track name and the screen name, VIIY drops each file onto the timeline at the position of that screen — the naming is what does the routing, so name your exports well and this step costs you nothing.
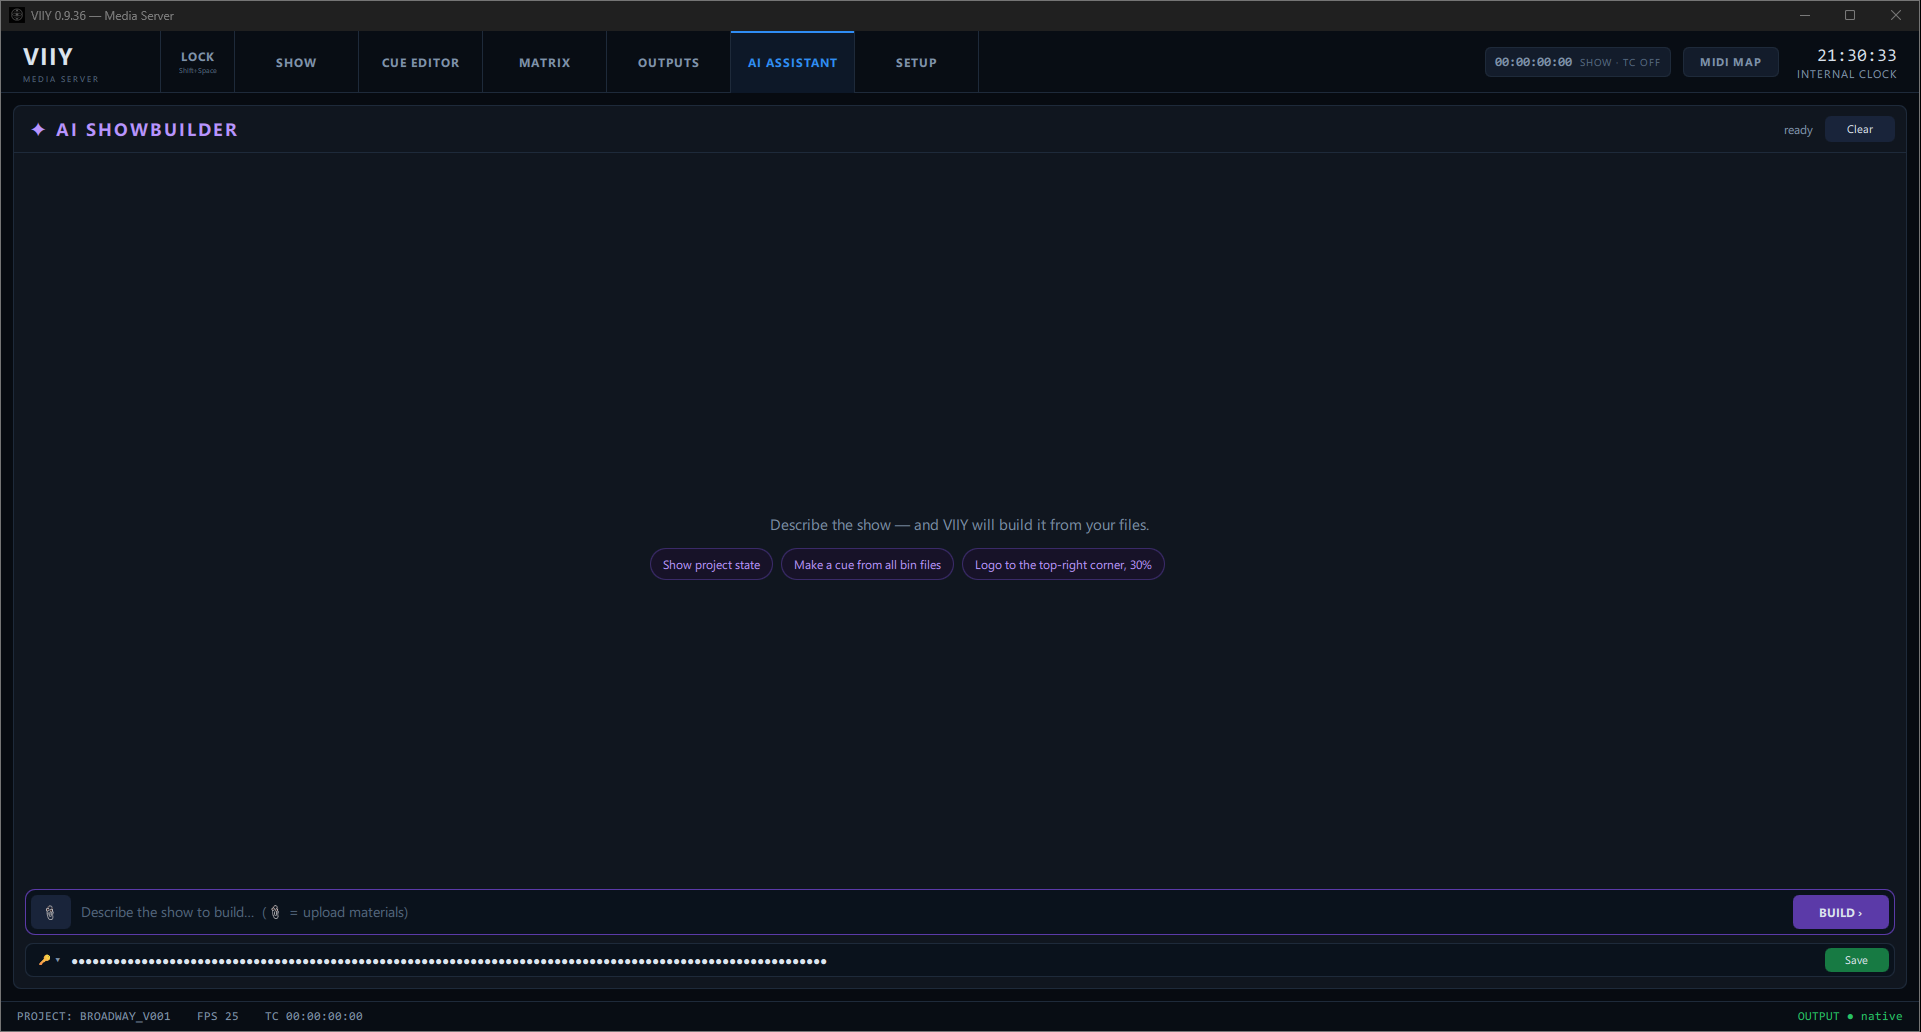
2 · Let it build
Attach the materials with 📎 and ask for the show. You do not have to do it in one go — send the timecode sheet first, the stage plan later, and keep asking questions in between.
What is written above takes far longer to read than to do. In practice it is a few mouse clicks, and you watch it happen in real time — cues appearing in the list, files landing on the timeline, the screens lighting up. It looks strange, and it is very fast.
3 · Convert the media to HAP
For smooth playback the footage should be in HAP. Two ways:
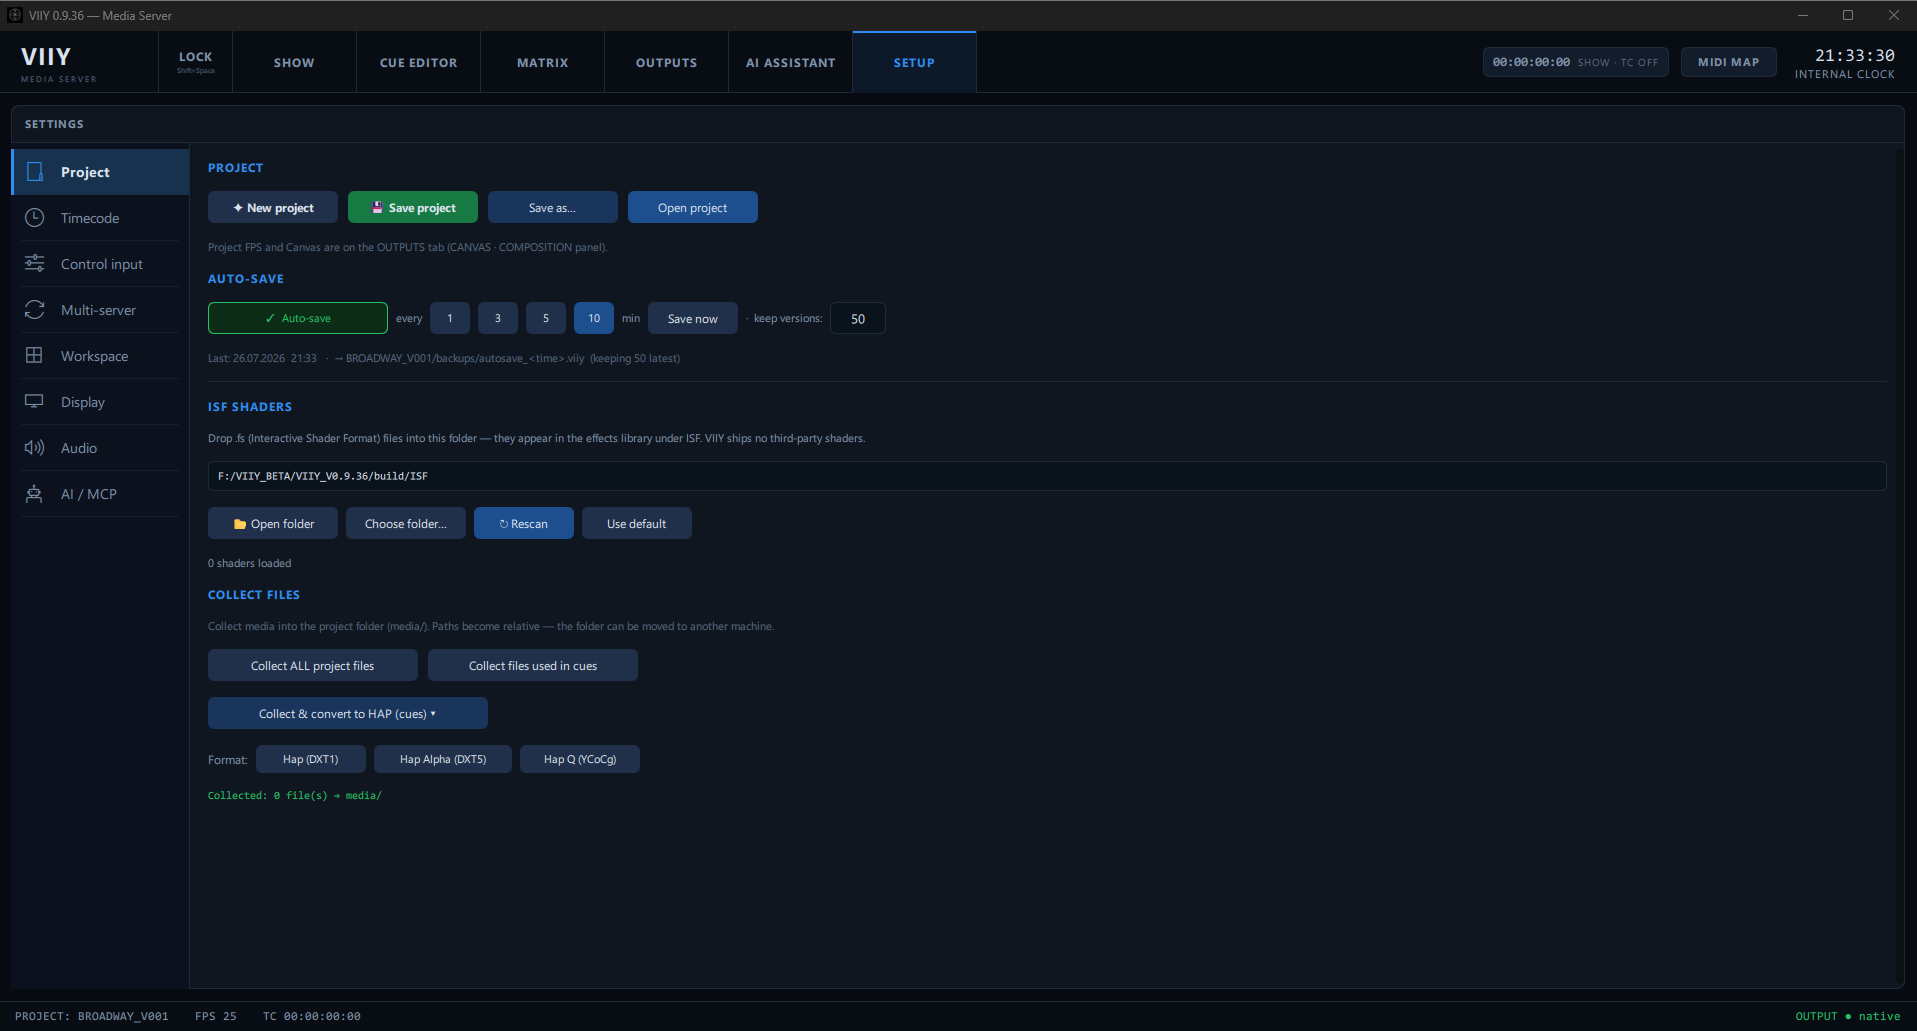
- convert files one by one (or all at once) from the PROJECT bin — Convert to HAP ▸ (Hap / Hap Alpha / Hap Q);
- SETUP → Collect files → Collect & convert to HAP, choosing the HAP flavour you want. This is the one to use. It converts and moves everything into your project folder, so the project stops depending on where the originals happened to live.
4 · That is a show
You may still want to touch things up by hand — but if the documents were accurate and complete, there should be nothing to fix. If you do not trust the mechanism, it is worth trying once: it saves hours.
Global elements
Top navigation
- VIIY brand on the left, then the tabs (the active one has a blue bar on top), and on the right the TIMECODE widget ⭐ (the show clock + source + TC ON/OFF — see TIMECODE), the SHOW MODE button (SHOW MODE) — moved here in v0.9.39 from beside the logo, where it sat against the SHOW tab ⭐ — the MIDI MAP button and the INTERNAL CLOCK (hh:mm:ss).
Bottom status bar
Live values: PROJECT: <name> · FPS 25 ·
TC 00:00:00:00 · on the right OUTPUT ● native (output mode).
On the left — the name of the selected object of the current tab (cue / layer / slice) and a row of
COPY CUT PASTE
DUPLICATE DELETE that acts on that object.
Splash screen
A separate borderless 600×340 window in the centre (the V:I:I:Y logo + a gradient loading bar). The main window appears once initialization is complete.
Numeric fields & formulas ⭐
Every numeric field behaves the same way:
- Click = edit and select all; drag left/right on the field = scrub the value.
- Formulas are accepted: type an arithmetic expression and press Enter.
Examples:
1080+56,/4,*2, parentheses. A leading operator is relative to the current value —/4divides the current number by four,+100adds one hundred. - Timecode fields accept the same idea:
+104= +1 second and 4 frames,/4scales. - An out-of-range result reverts to the previous value (nothing is silently clamped to junk).
This works in NumSpin / NumField spinners, composition size, FPS, grid step and the New Project dialog.
Hotkeys
Single-letter keys do not fire while a text field is being edited. F-keys always work.
| Key | Action |
|---|---|
| F1…F7 | tabs, in bar order: SHOW · CUE EDITOR · MATRIX · OUTPUTS · AI · ACTION · SETUP Changed in v0.9.45: ACTION moved next to SETUP and took F6; SETUP is now F7. F1–F5 are unchanged. |
| F12 | all outputs ON/OFF (opens every screen whose monitor is connected, or closes them all) |
| Shift+Space | SHOW MODE — lock editing for the show. Locking is instant; unlocking needs a second press within 2s (or holding the button for 2s) ⭐ v0.9.37 |
| M | CUE EDITOR: drop a marker at the playhead ⭐ v0.9.37 |
| Shift+M / Ctrl+Shift+M | go to next / previous marker ⭐ v0.9.37 |
| Ctrl+S | Save the whole project to disk (Save As if it has no folder yet) ⭐ Known limit: if the focus is still inside a text field or the cue list, the key may not fire — click the timeline and repeat, or use SETUP → Save project. |
| Ctrl+M | toggle MIDI MAP mode (map controls to a MIDI surface) ⭐ |
| B | BLACKOUT (toggle; restores the previous master level) |
| Space / Backspace / P | SHOW: GO / BACK / Pause–Resume |
| Space | CUE EDITOR: Play / Pause |
| Home End · , . | playhead: start/end · −1/+1 frame |
| Shift+, Shift+. | playhead ±5 frames ⭐ v0.9.39 |
| ← → | nudge the selected keyframe ±1 frame |
| Shift+← Shift+→ | nudge the selected keyframe ±5 frames ⭐ v0.9.39 |
| ↑ ↓ | jump to the previous / next edit point on the timeline — every clip edge, not a fixed step ⭐ v0.9.39 |
| S | CUE EDITOR: SNAP on/off ⭐ v0.9.39 |
| Ctrl+A | CUE EDITOR: select every clip on the selected layer ⭐ v0.9.39 |
| C / V | CUE EDITOR: arm the RAZOR blade / back to selection ⭐ |
| Ctrl+K / Ctrl+Shift+K | add edit (cut) at the playhead: selected layer(s) / all tracks ⭐ |
| + − F · PgUp PgDn | timeline zoom / Fit · horizontal scroll |
| Ctrl+Alt+C / Ctrl+Alt+V | Copy / Paste Attributes — copy a layer's attributes, paste the chosen groups onto every selected layer ⭐ v0.9.38 |
| Ctrl+Shift+A | CUE EDITOR: new ✦ adjustment layer above the selected one — effects on it treat everything below as one picture ⭐ v0.9.76 |
| Ctrl+Z / Ctrl+Y (Ctrl+Shift+Z also redoes) | Undo / Redo (editor). A whole gesture is one step ⭐ v0.9.39 — dragging a fader or a corner in the preview undoes in a single press, not value by value |
| Ctrl+C/X/V Ctrl+D | copy / cut / paste / duplicate the last-clicked object — a cue row, a layer, a clip on a track, a bin file, a slice or a screen. Paste is driven by what is in the clipboard: copy a clip, click another layer, Ctrl+V pastes the clip at the playhead. ⭐ v0.9.33 |
| Delete | delete the selected object. A clip goes immediately, with no dialog — the action is undoable, and a group delete comes back in one Ctrl+Z ⭐ v0.9.40. Cues, layers, screens and slices still ask. SHOW: delete selected cues (multi-select) |
| Esc | in a physical output window — close the output; in the UI — cancel the current action |
Launcher & dialogs
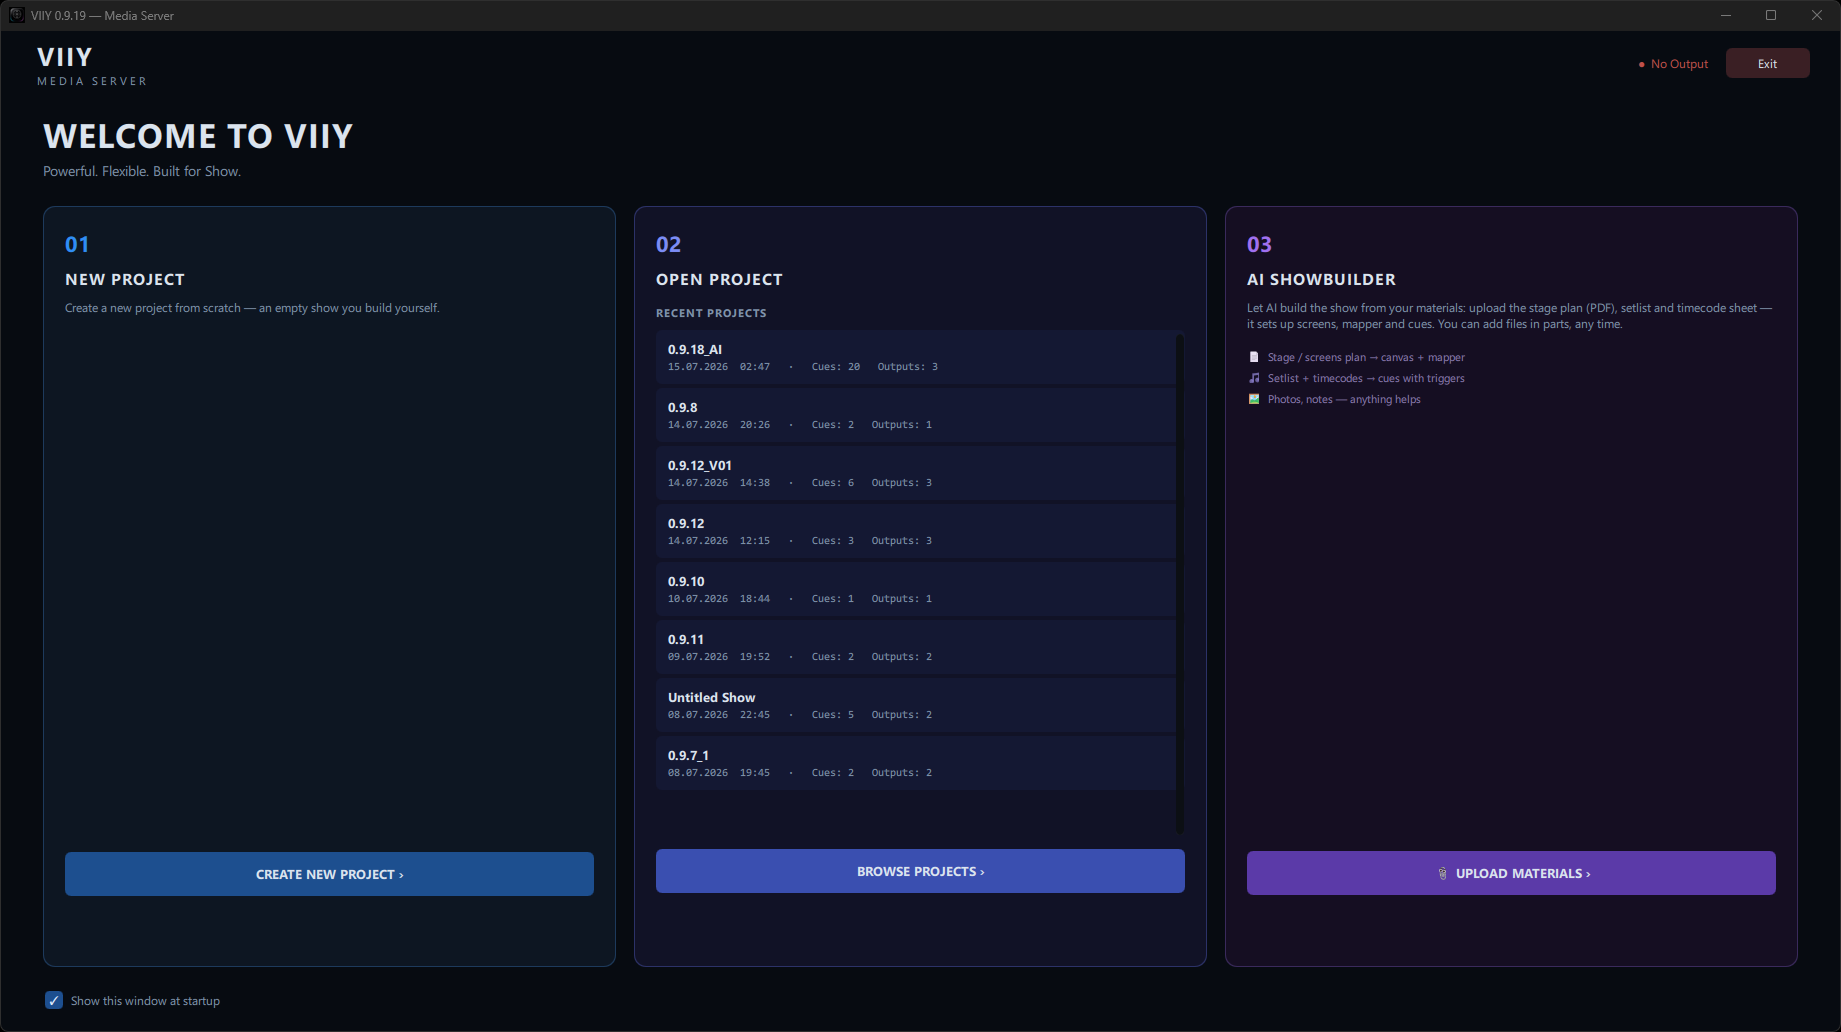
Welcome (launcher)
A full-screen overlay at start: NEW PROJECT and OPEN PROJECT cards, a RECENT list (click to open), an AI Showbuilder card (upload materials to build a show) and a "Show this window at startup" toggle.
NEW PROJECT
Name → folder (Browse…) → Project FPS (24/25/30/50/60 — this is the project frame standard; the decks, engine and outputs all live by it) → Canvas (WxH, "From file…" takes the size from a file, plus presets) → Create ›.
Closing the app
A "Save before closing?" dialog: Cancel / Don't save / 💾 Save. All physical outputs close on exit.
SHOW — the playout desk
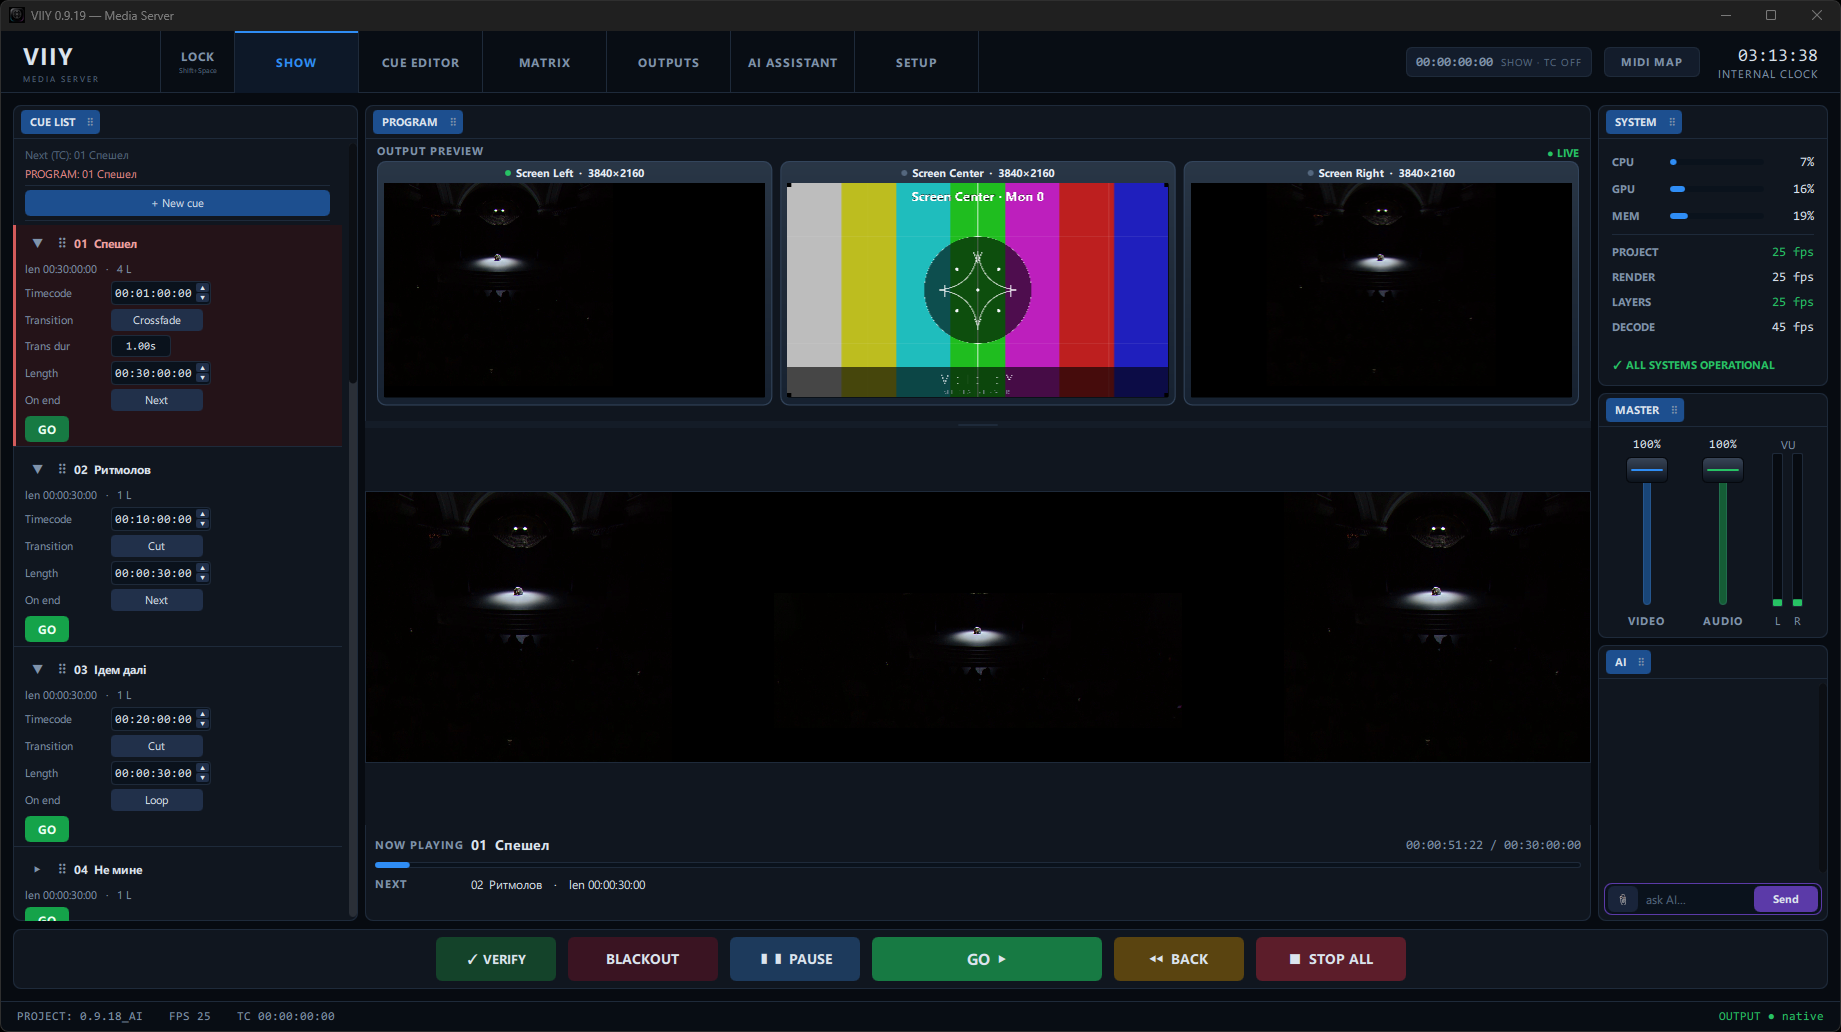
The live tab: you do not edit here, you play finished cues. Three columns plus a transport bar at the bottom.
Left column — CUE LIST
- Every cue owns its number ⭐ v0.9.64 — the figure on the left of
the row. It belongs to the cue, not to its position: deleting, inserting or reordering other cues
never renumbers it. That number is what a control surface addresses (
/viiy/gocue, the MIDI cue action), so the figure on your paper running order, the figure in the list and the button on your Stream Deck are the same figure. Shows saved before v0.9.64 get their numbers from the current order — exactly the numbers they were already addressed by, so existing mappings keep working. - Next (TC) / PROGRAM info lines — the nearest timecode cue and what is on air. The show clock itself lives in the header (visible from every tab) and the timecode source is picked in SETUP — see TIMECODE ⭐.
- + New cue — a new empty cue (1 layer). If the program is playing, the editor moves to the EDIT sandbox by itself.
- Cue row (▶ expands): Timecode · Transition (Cut→Crossfade→Wipe) · Trans dur · Wipe soft ⭐ (shown for Wipe: softness of the wipe front as a % of canvas height, 0 = hard edge, default 8) · Length · On end (Still→Loop→Black→Next→Cue) · GO. The on-air cue is maroon; the current one is blue. Multi-select: Ctrl / Shift. Drag ⠿ to reorder — dragging a selected cue moves the whole selection as one block, with a floating proxy and live make-space; Ctrl+Z undoes the move. Cues start collapsed by default. Changing On end of the on-air cue applies immediately — no re-GO needed. ⭐
- Cue thumbnails ⭐ — every cue row carries a still of its composite, captured automatically at the playhead position on the first save (the operator decides where the representative frame is). Updating a cue keeps the old thumbnail; right-click → 🖼 Update thumbnail (current frame) re-shoots it. The first cue's thumbnail also becomes the project tile in the launcher. Clip bars on the timeline show their own start/end thumbnails too.
- Batch edit ⭐ — with several cues selected, right-click → ⚙ Batch edit selected (N)…: set the same Transition / Trans dur / Wipe soft / Length / On end for all of them, shift their timecodes by ±offset, or ⇄ Match all to current cue (copy transition + on-end + next-cue from the current cue onto the selection). One dialog action = one undo step. Expand/Collapse selected and Duplicate/Delete selected live in the same menu.
- Wipe ⭐ is a true spatial transition: the incoming cue sweeps in left-to-right with a soft feathered front, rendered once in the engine — the preview and the physical outputs show pixel-identical frames. Audio crossfades with the wipe progress.
- Right-click a cue: ✎ Edit background · 💾 Save/Update from editor · + New cue · Save as… · Rename · Copy/Cut/Paste/Duplicate · 🔥 Bake to file… · Delete.
Centre — PROGRAM
- OUTPUT PREVIEW — thumbnails of each physical screen, framed like a professional rack monitor (name + status dot on the bezel, true aspect). ⭐ Each thumbnail shows the actual output render (same engine, pixel-identical: slices, warp, colour correction, routes, test cards) — for open outputs it is literally the frame sent to the monitor; closed outputs are rendered headless just for the preview. What you see is exactly what the wall gets. The "N/M outputs ▾" chip filters the strip ⭐: a checkbox per OUT + Show all — handy when only some screens matter on a big rig (a session filter, not saved).
- NOW PLAYING — the on-air cue and its progress; a free PROGRAM shows a green "free PROGRAM · LIVE". NEXT — what the On-end rule will play.
Right column
SYSTEM: CPU / VRAM / MEM. VRAM is video-memory use vs the Windows budget, not GPU core load — it turns amber over 80% and red over 95%; above 100% the budget is exceeded and Windows spills textures to system RAM (stutter) — convert heavy H.264 media to HAP to fix it. ⭐ v0.9.32 Then PROJECT (frame standard) · RENDER (real engine fps) · LAYERS (honest layer frame rate: min..max new frames/s; "—" = the engine is asleep) · DECODE (total decoder throughput). MASTER: VIDEO/AUDIO faders + VU meter. ACTION / AI — two pages of one panel; ACTION is in front by default, AI is one click away. Next to them sits MSG — the one-off message to the crew screens.
Do not confuse the two: this panel is the operator's own event feed on the desk. The ACTION tab (F6) is a separate page — the live preview of the crew screen, the show-wide event rules and the list of every event of the show; and the ACTION output is the physical screen the crew looks at. All three read the same selection of events ⭐ v0.9.44. See ACTION screen.
ACTION — the event feed ⭐ v0.9.37
Turns the timeline markers of your cues into a running list of events with a countdown — what a theatre calls the stage manager's book. Markers are placed in the CUE EDITOR (M, see below).
- Events of the cue on air — with a live countdown (
− 0:07). - Events of the cues ahead — prefixed with the cue number (
08 · +0:12), so a warning that sits on a cue boundary is visible before you press GO, not after. - Approach phases: calm beyond 10s → highlighted under 10s → bright and bold under 3s → the row blinks when the moment comes. A fired event lingers for a second, then clears — the row is worth more to the next event than to one already done. On a paused deck the hot phase is suppressed ⭐ v0.9.45: the countdown is frozen anyway, so blinking "2 seconds" would promise something that cannot happen until GO.
- How many rows — the
rowsselector (1…15). The same number drives the font size:1is one event across the whole panel in huge letters,15is a dense overview. The choice is remembered. - Row colour = marker colour. Handy for assigning colours to departments (green — props, pink — stage management): the eye reacts to colour faster than it reads text.
- The desk panel and the crew screen show the same selection ⭐ v0.9.44 — same filters, same labels, same colours. They differ in pixels, not in content, so you never argue with a department about what their screen said. See ACTION screen.
- MSG — a one-off message to every crew screen (HOLD · STANDBY · 5 MIN, or your own text). Details.
Transport (bottom)
SHOW READY (see below) · BLACKOUT · PAUSE/RESUME · GO ▶ · ◀◀ BACK · ■ STOP ALL.
SHOW READY — one button before doors ⭐ v0.9.37
The button keeps the result of the last run in its colour: grey SHOW READY?
— not checked yet · green ✓ — clean · amber ⚠ — warnings ·
red ✖ — critical. Hover shows when it was run and the summary.
It checks: project saved (naming what exactly is unsaved) · media online (every file of every cue, codec and fps) · media collected into the project folder · outputs (monitor present, output open, refresh a multiple of project fps) · timecode conflicts between cues · Main/Backup and split-brain · Sync PIN · external timecode (input on? signal locked?) · audio device · VRAM headroom · which graphics card the show actually renders on ⭐ v0.9.65.
[gpu] …) and shows it here: card, memory, driver, Direct3D
level, number of screens. It speaks up when the machine has two cards and the screens hang
off the one we are not rendering on — every frame then crosses the bus between cards, which
looks like "it is just slow" and reports no error anywhere. It also names a software adapter (no
acceleration at all) and a Direct3D level below 11_0.
There are deliberately no thresholds here — no "at least N GB", no "driver newer than X". We have not measured those numbers, and an invented limit is worse than none. VIIY states the facts; the call is yours.
At the bottom: ▶ ENTER SHOW MODE — verify and lock the desk in one move. It is not blocked by findings: sometimes a show starts with a known problem, and that call belongs to the operator, not the software.
SHOW MODE — locking the desk ⭐ v0.9.37
The button in the right-hand side of the header, next to the TIMECODE chip ⭐ v0.9.39 (or Shift+Space) locks editing: tabs, cues, layers, mapping and outputs stop reacting to clicks. Still live: GO · BACK · PAUSE · BLACKOUT · STOP ALL and Ctrl+S. Rehearsal is an editor; a show is a desk.
Show journal — what happened at 20:47 ⭐ v0.9.64
VIIY keeps <project>/show.log — one line per on-air event, with the wall clock and the show clock side by side:
2026-08-19 20:47:13  GO  cue 14  "15 ALL SCREENS GRID"  [SHOW 01:12:03]
2026-08-19 20:49:02  BLACKOUT ON  [SHOW 01:13:52]
- Logged: GO (with the cue's own number and name), STOP ALL, BLACKOUT on/off, FREEZE on/off. Editing is not logged — a journal that catches every slider move has to be read with your eyes afterwards, which means it fails exactly when you need it.
- Kept outside SHOW MODE too: an incident at rehearsal is still an incident, and that is the cheap place to catch it.
- Both clocks on purpose: an incident is reconciled either against the hall's video recording (wall clock) or against a timecoded run. One of the two is half an answer.
- The file is appended to, never rewritten, so a crash costs at most the last line.
If no project has been saved yet, the journal goes to VIIY's own folder instead, so the events are not lost.
Auto-save, and what happens if VIIY does not close normally ⭐ v0.9.61
Auto-save (SETUP → Project) drops a timestamped copy into <project>/backups/ every 1 / 3 / 5 / 10 minutes and keeps the N newest. It never touches your .viiy — that one is written only when you save.
- In SHOW MODE auto-save pauses. One copy is taken the moment you lock the show, and the timer stops until you unlock. Editing is locked anyway, so the copies would be identical — and each one costs the GUI thread a serialisation of the whole show while pictures are on screen.
- ⚠ MATRIX stays live under the lock (that is the point of it — switching a camera mid-number). Routing you change during the show is therefore not in that copy: the copy is the show as it stood when you locked it.
If VIIY is killed, loses power or crashes, the next time you open that show it says so and offers the newest copy — with the time it was taken and how much newer it is than the show you just opened.
- A copy that is older than your last save is never offered. With a 10-minute interval it is perfectly normal for the show on disk to be the newer of the two, and "restoring" it would roll your work backwards. VIIY compares the two and stays quiet when there is nothing to gain.
- Opening the copy changes nothing on disk. It loads into the session and the show is marked unsaved; the .viiy stays as it was until you press Ctrl+S. Declining deletes nothing either — the copy stays in backups/.
- The question is asked once. It does not come back every time you open the show.
CUE EDITOR
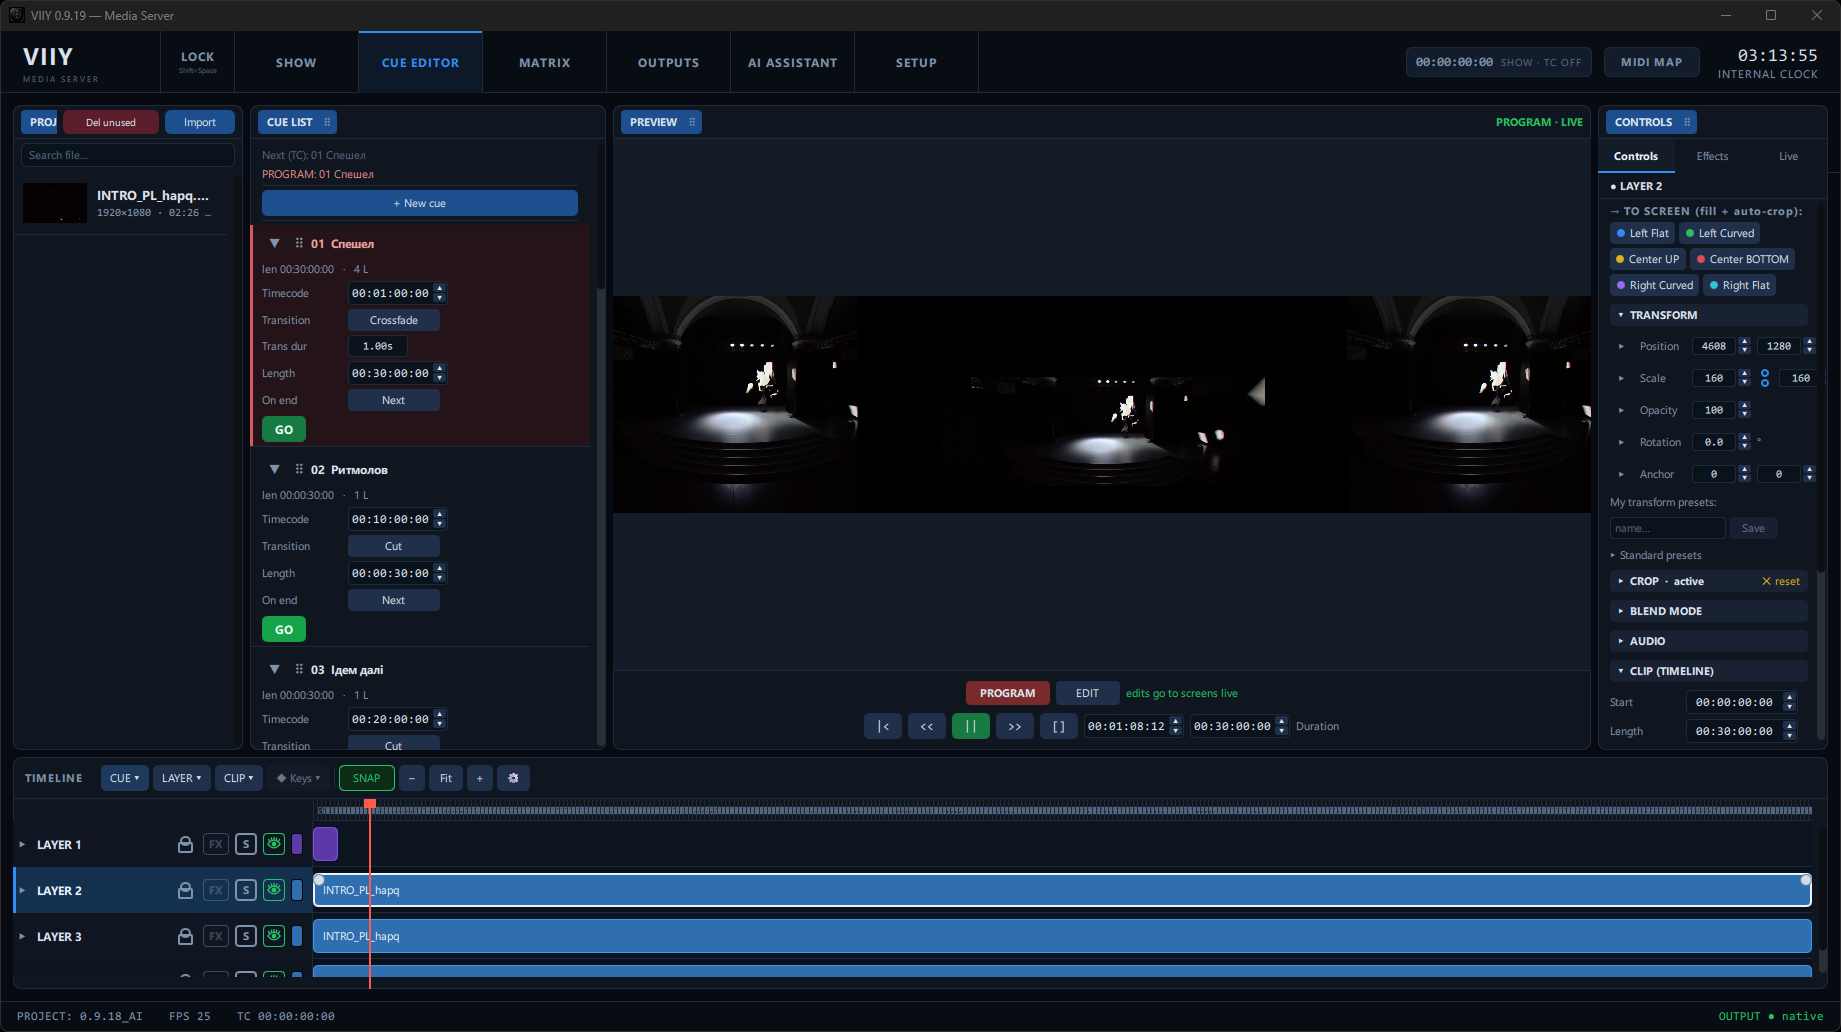
Layout: PROJECT (bin) → CUE LIST → PREVIEW → the right panel (Controls / Effects / Live); the TIMELINE is along the bottom.
PROJECT (media bin)
- Import, Del unused, search; double-click empty space = Import — the list always keeps a small tail strip below the last file ("double-click to import"), so the gesture works even when the bin is full. ⭐
- Drag & drop from Windows Explorer straight onto the PROJECT panel — individual media files or a whole folder (scanned recursively, up to 500 files). A "⬇ Drop files to import" highlight shows the drop zone; duplicates are skipped. ⭐ v0.9.32
- File row: thumbnail, name, "1920×1080 · 03:05 · 25fps · hap · audio" (interlaced files are tagged "· interlaced"); a conversion progress bar.
- Audio files (MP3 / WAV / FLAC / AAC / M4A / OGG / AIFF) import alongside video and images — the Import dialog has an Audio filter. Dropped on a layer they become audio clips (see TIMELINE ▸ Audio file on a layer). ⭐
- Double-click — put the file on the selected layer; drag — onto a timeline track (the drop X position becomes the clip start time). Multi-select Ctrl/Shift.
- Right-click: Create cue from each / one from all · Open into selected layer · Convert to HAP ▸ (Hap / Hap Alpha / Hap Q, with an optional deinterlace choice) · Replace file… · Rename · Duplicate · Remove from bin.
- Folders ⭐ v0.9.62 — create one, rename it, drag files into it, collapse it. One level only, on purpose: nested folders sort a film archive, not the material of one show, where they hide more than they organise. Deleting a folder takes its files with it (after a confirmation) rather than tipping them back into the root — that is what the hand expects when it removes a whole block of material. Ctrl+Z brings everything back.
- Import Folder ⭐ v0.9.62 — a button inside the open dialog, as in Premiere: the whole folder arrives as a folder in the bin, video and audio. Every route into the bin — the button, the dialog, a drag from Explorer, a double-click — now behaves identically; which gesture you started with is not supposed to change what you get.
- Sorting ⭐ v0.9.62 — by name, duration, size or date, with the icon row under the list. It survives a restart: sorting is a habit of the operator, not a property of the show, so it is stored with the machine and does not travel inside the project file.
- New Item ⭐ v0.9.62 — Black, Colour Matte or a Timecode counter. No file is written to disk: the engine draws these itself, so they cost nothing and can never go missing.
- A second copy of the same file is allowed, but VIIY asks ⭐ v0.9.62 — once for the whole import, not once per file, and the default answer is "don't add". Useful when you deliberately want the same clip twice with different in/out points.
- The bin is in Undo/Redo ⭐ v0.9.62 — import, delete, folders, renaming: Ctrl+Z covers all of it.
- Show usages… (N cues) ⭐ v0.9.38 — where this file actually plays: a list of the cues that use it with the layer count and the layer names. Clicking a row goes to that cue, it does not just report it. Select all cues using this file puts the whole list into the normal cue multi-selection (Batch edit, Delete and the rest then act on it), and Reveal in Explorer opens the file's folder. The same three items sit on the right-click menu of a clip on the timeline, so you can ask "what else is this footage in?" from either side. Answer before deleting, not after.
PREVIEW + transport
- PROGRAM / EDIT — the editor mode (see the concept). The label next to them explains: "edits go to the screens live" / "background: preparing a cue (program keeps playing)". Since v0.9.37 they sit above the picture and are larger: this is the answer to "are my edits going on air right now?", so it belongs next to the picture it is about, not among the player keys. ⭐ v0.9.37
- Player ⭐ v0.9.37: neon keys centred in the panel — |◀ start · ◀◀ −5s · ▶/❚❚ play (wider, lit; green while playing) · ▶▶ +5s · ▶| end (new) · ■ stop & rewind. The playhead timecode sits to their left and Duration to their right, both editable and set in a larger bold face — meant to be read from behind the desk. The keys stay centred regardless of timecode width, so the hand learns one place. (Duration: auto = length of the first file; shortening it trims the ruler, not the clips.)
- Scrubbing is live in both directions (a frame ring keeps a buffer behind the playhead; a fast drag backwards steps in even jumps — codec physics).
Right panel — CONTROLS
- → TO SCREEN right at the top — a button per mapper slice ("screen" of the show); a click drops the selected layer into it (see "Slice presets + CROP").
- TRANSFORM: Position X/Y (spinboxes + on-canvas sliders via ▸), Scale (lock ratio),
Opacity, Rotation, Anchor. My transform presets (save your own to
PRESETS/My transform presets) + Standard presets
(Fit/Fill/Stretch/100%, a 3×3 grid, scales).
The four fits do four different things ⭐ v0.9.76, the way Resolume and After Effects define them: Fit — the whole source stays visible, proportions kept, so bars appear on two sides; Fill — the canvas is covered, proportions kept, so the overflow is cropped; Stretch — the picture is warped to the canvas exactly (this one releases the ratio lock, otherwise your next edit would silently undo it); 100% — the source pixel for pixel, centred. All four touch position and scale only: rotation, anchor and crop stay as you left them. Until v0.9.76 all four buttons did the same thing.
Rotation turns clockwise for a positive angle ⭐ v0.9.65 — the same way a screen's Input rotation, a title and every editor next door (After Effects, Premiere, Resolume) turn. Until v0.9.65 a layer turned the other way, so the same number meant two different things in one show. Shows made before that are converted when you open them: the angle in the field flips sign, the picture on screen stays exactly as you set it. - CROP ⭐ — L/R/T/B in %, "· active" in the header, ✕ to reset. Inside it — SOFT EDGES ⭐: ON/OFF + L/R/T/B strength (0–50%) — a soft alpha ramp from the crop/frame edge. Uses: soft slice edges, projector edge-blending, vignettes. Off = zero cost; the strengths are remembered while off.
- CORNER PIN ⭐ — a per-layer perspective warp: toggle + 8 numeric corner offsets + Reset, and drag handles directly on the preview (4 corners + outline). Handles that end up outside the composition (video larger than the window / a corner pulled out) stay visible and grabbable across the whole preview area, with an amber ring when off-comp. Perspective-correct on the GPU; keys/crop apply before the pin.
- BLEND MODE: Normal / Add / Screen / Multiply.
- AUDIO: ON/OFF, volume (0–150%), 🔒 Linked / 🔓 Unlinked (separate audio file & timing).
- CLIP (TIMELINE): Start · Length · Source in/out · Fade in/out · Speed (1–1000%; the audio follows it ⭐ v0.9.61 — the pitch rides with the speed, like tape: 200% is twice as fast and an octave up. A separate (unlinked) audio file keeps its own timing and ignores the speed, because its own start/length were never scaled) · Loop. With Loop off the clip is "solid" at its source length and holds a freeze-frame at the end; with Loop on the out is stretched to the cue and the clip loops seamlessly.
Parameters belong to the CLIP ⭐ v0.9.38
Cut a layer with the razor and each piece is a self-contained clip: its own transform, its own effect stack, its own keyframes, its own crop / corner pin, its own volume. Editing one does not move the one next to it.
- CONTROLS and EFFECTS edit the clip under the playhead. Clicking a clip makes it the target even when the playhead is elsewhere (click = select), and the corner-pin handles on the preview sit on the clip you are editing.
- Shift+click builds a clip selection (selected clips carry a frame). Changing a parameter then applies to all selected clips at once, in one undo step. Keyframes and the effect stack are deliberately not broadcast — animation and a chain of effects are never "the same value".
- Cutting between keyframes is seamless: both halves inherit the curve, so the join does not jump.
- Old projects open byte-for-byte as before — nothing is converted. A layer only starts carrying per-clip parameters once you cut it or add a second file.
- The selection is dropped whenever the structure changes (cut, delete, join, paste, Undo), so a panel can never quietly write into the neighbouring piece.
Reset ↺ — with a choice ⭐ v0.9.39
Every section header in CONTROLS (TRANSFORM · CROP · CORNER PIN · BLEND · AUDIO) carries a ↺ icon.
- Click — reset that section on the current clip.
- Right-click — a menu: reset this section · ALL controls (transform · crop · pin · blend · audio) · effects only · Reset selected clips (N) — the whole Shift-selection at once, as a single undo step (with no clip selection it offers the selected layers instead).
- Right-click a parameter's diamond → Reset parameter — back to the default value and the animation of that group removed.
Copy / Paste Attributes ⭐ v0.9.38
Ctrl+Alt+C copies the attributes of a layer, Ctrl+Alt+V opens PASTE ATTRIBUTES, plus the same two items in the layer and clip right-click menus. Tick what should travel:
- Transform (position · scale · rotation · anchor) · Opacity & blend mode · Crop · feather · corner pin · Effects (the whole stack, replacing the target's) · Audio (on/off · volume) · Timing (speed · fades · loop) · Keyframes (replaces the target's animation).
- Shortcut buttons: All · None · Transform only · Effects only. The tick set is remembered between uses.
- The paste lands on every selected layer in one undo step. Locked layers are skipped, and the video file, the clip length and the layer name are never pasted — only the attributes above.
The right panel tabs are Controls (default), Effects and Live. EFFECTS — a searchable library: double-click or drag onto a timeline layer. LIVE — cameras/inputs (Refresh): click = to the bin, double-click = onto a layer.
TIMELINE
- A single toolbar: CUE ▾ LAYER ▾
CLIP ▾ ◆ Keys ▾ ·
SNAP · RAZOR · − / Fit / + · ⚙ (Timeline settings: Duration) ·
SAVE ALL.
SAVE ALL saves the whole project to disk (same as Ctrl+S) — and before it writes,
it applies the editor's layers back into the cue you are editing, so one gesture covers both.
⭐ v0.9.51 The separate SAVE CUE button is gone: two buttons side by
side, both saying "save", read as two levels of the same thing — while one applied the editor to the
cue and the other wrote the file. You can still write the editor into a specific cue by hand:
right-click it in the CUE LIST → "Save cue".
SAVE ALL now shows whether there is anything to save ⭐ v0.9.37:
a calm grey
✓ SAVEDwhen everything is on disk, an amber● SAVE ALLafter any edit — with a plain-language summary next to it ("3 unsaved cues · output map changed"). The window title carries the same dot:ProjectName.viiy ●, so the state is visible even when VIIY is minimised. Work that belongs to no cue is never wiped in silence ⭐ v0.9.75 — if you build something on the timeline without saving it as a cue, then press + New cue, open another cue, or build a cue from the bin, VIIY asks first: Save as new cue · Discard · Cancel. The same question already guarded saving and closing; since v0.9.75 it guards every door that replaces the timeline. Right-clicking empty timeline space mirrors the full menu (it also carries Add marker). LAYER ▾: + Layer · ✦ Adjustment layer · ◼ Solid… (a colour layer via a picker — it behaves like a normal layer: transform / crop / effects / blend / keys; the colour is stored in the cue; zero cost) · Rename layer · Delete layer. - Import a timecode sheet ⭐ v0.9.37 — right-click empty
timeline space → Import timecode list…. Takes a plain text file where each line holds a
track name and its start timecode, and writes that into the
Timecodefield of the matching cue (the very field CHASE follows):01 - FOREVER BROADWAY OVERTURE 00.10.00.00Accepts
08_PUT_IN_THE_RITZ 01.20.00.00HH.MM.SS.FFandHH:MM:SS:FF; frames are optional. Matching is by name and deliberately forgiving — underscores, dashes, slashes and the various apostrophe characters are folded together, so12_13_BOWS_NYfinds the cue12/13 - BOWS NY. If a name was rewritten entirely, a second pass matches the leading number. Each cue accepts only one line, so two similar entries cannot overwrite the same cue. A report is always shown — what landed where, and what did not match. A silent timecode import is the worst thing that can happen before a show: the operator would not know which numbers were left without a mark. - MARKERS on the ruler ⭐ v0.9.37 — M drops a marker at the playhead, Shift+M /
Ctrl+Shift+M jump to the next / previous one, a double-click opens the marker
dialog (Name · Comments · Duration · Color, 8 colours, green by default), dragging moves it,
right-click offers go-to / clear / clear all. A Duration above zero turns a marker into a range
rather than a point, and a bar is drawn beneath it.
Markers belong to the cue — they travel with the project and with a copied cue — and they are
what fills the ACTION feed in SHOW. So the marker Name is what a department reads during
the show: put
PROPS/FOG/LXthere and the detail in Comments. In PROGRAM the markers address the cue that is on air ⭐ v0.9.44, so you can place and edit them live; with nothing on air they address the cue selected in the list. An edit you start stays with its own cue even if the show auto-advances while you are typing ⭐ v0.9.45. The whole show is also listed in the ACTION tab (All events in the show), where an event's timecode can be retyped directly. - Per-layer track, buttons on the right: lock (a locked layer cannot even be selected — the row flashes, CONTROLS never targets it, moves/trims/keys are all blocked; Unlock all in the layer menu) · FX (bypass the layer's effects) · S — layer SOLO: mutes every other layer of the cue (video + audio; several solos allowed at once; amber = active; stored in the cue) · eye (layer ON/OFF). The clip drags (move / trim), drag ⠿ to reorder layers. Delete will not remove the last layer. Multi-select layers with Shift/Ctrl-click on the gutter: group delete, and dragging a selected gutter moves the whole selection as one block (order kept, Ctrl+Z undoes). Clip bars show thumbnails of the first and last frame of the trimmed range. The edge of a clip always trims ⭐ v0.9.75 — the grab band straddles the edge (a few pixels outside the clip, nine inside) and covers its full height, so you do not have to hit the edge exactly. The fade handle sits further in, clear of that band: before v0.9.75 it claimed the top half of the edge, and "grab the edge and pull" silently produced a fade instead of a trim. A fade is now visible ⭐ v0.9.75: a slanted line from the corner of the clip up to the handle, with the area under it darkened — the picture rising out of black is drawn the way it actually behaves.
- Multi-clip layers ⭐ — one track can hold several files cut sequentially in time, the way editors expect from an NLE. Gaps between clips are allowed: in a gap the layer is simply transparent (and its decoder is released). Joins are hard cuts; each clip keeps its own trim (source-in), speed, loop and fade in/out handles. Since v0.9.38 transform, effects and keyframes belong to the clip too ⭐ — see "Parameters belong to the CLIP" above. To add another file to an occupied track, drag it from PROJECT and drop it at the wanted time — the drop X position becomes the clip start; the new clip lands in the free space after existing ones. The CONTROLS ▸ Clip section edits the clip under the playhead. Right-click a clip: ✂ Cut at playhead · ⇥⇤ Join through edits · Copy clip · Cut clip · Paste at playhead · Duplicate clip ⭐ v0.9.33 · Copy Attributes · Paste Attributes (to this clip or to all clips of the layer) · Show usages… · Reveal in Explorer ⭐ v0.9.38 · Delete · Delete SELECTED clips (N) · Delete ALL clips ⭐ v0.9.40 — one verb for all three, so the choice reads by how much it removes, not by which word was used. The clip clipboard is the razor's best friend: cut a piece out, Copy clip, move the playhead (same or another layer) and Paste at playhead — the clip lands in the free gap, trimmed to fit; clips carry their own source, so pasting across layers works too. Old single-clip projects are untouched — a layer becomes multi-clip only when you cut or add a second file.
- RAZOR ⭐ — the blade tool for cutting clips, with the shortcuts an editor's muscle memory expects. C arms the blade, V returns to normal selection. With the blade armed the cursor becomes a razor with a thin vertical cut line under its sharp corner — the cut lands exactly on that line. The blade magnetises to the playhead (line and blade turn playhead-red when locked on) and, with SNAP on, to whole seconds. Click cuts the clip under the cursor; Shift+click cuts all tracks at that point. Ctrl+K adds an edit at the playhead on the selected layer(s); Ctrl+Shift+K — on all tracks (one undo step for the whole gesture). A cut whose halves were never trimmed can be healed: right-click the right half → ⇥⇤ Join through edits (offered only while the two halves still continue each other seamlessly in the source). Locked tracks are never cut. The playhead itself is grabbed only in the timecode ruler strip, so it never steals clicks from tools over the tracks.
- Audio file on a layer ⭐ — drop an MP3 / WAV / FLAC / AAC / M4A / OGG / AIFF from PROJECT onto a track: it becomes an audio clip at the drop position. On an empty layer it shows as a blue ♪ bar on the main track (move / trim like any clip) and the layer stays transparent on screen — sound only. Dropped onto a layer that already has video, the audio lands under the video on the same layer (unlinked audio; the ♪ bar lives in the expanded section, ▸ arrow). Audio plays into the PROGRAM master mix with the layer's volume / fades / solo / mute rules. Import dialogs have an Audio filter category.
- Keyframes: the stopwatch on a parameter enables animation; diamonds sit on the parameter track; right-click a diamond: Ease In/Out/Ease/Linear/Hold/Delete; ◆ Keys ▾ acts on the selected key.
EFFECTS ⭐ v0.9.34
Effects live on a layer (or on an adjustment layer, where they affect everything below) and on MATRIX routes. Drag one from the library onto a layer, or double-click to add it to the selected layer. Every numeric parameter can be keyframed (stopwatch) and MIDI-mapped. All of them run on the GPU in real time — nothing is pre-rendered.
Generative FX driven by your live signal ⭐
These four are the unusual ones: they generate imagery rather than filter it, and three of them can be born from the pixels of the incoming video by colour. The classic case: a camera on stage, a performer in a dark costume with a white trim — pick white, and sparks fly off the trim in real time.
- Particles ✦ — a GPU particle system (reference: Niagara / Trapcode Particular). Emit from colour + Tolerance choose which pixels spawn particles; Inherit source colour takes each particle's colour from the pixel it was born on. Rate, Life, Size, Speed, Direction, Spread, Gravity, Wind, Drag, Turbulence, colour at birth/death, shape (Round / Streak / Star / Square) and blend. 8 presets fill everything in one pick: Snow · Rain · Sparks · Embers · Smoke · Confetti · Magic dust · Bubbles. Cost scales with particle size (fill rate), not count — 100 000 small sparks are cheaper than 500 big smoke puffs.
- Lightning ⚡ — branching bolts (reference: Sapphire S_Zap). Curve amp (the large wander) and Wrinkle amp (the fine kinks) are separate controls — that separation is what makes a bolt look alive. Strike at Random / Colour key / Centre, from any edge; Bolts (several at once = plasma), Branches with angle and length, Vary endpoint, Reveal (the bolt grows in), Jitter vs Wiggle, core and glow colours, interval and duration.
- Lattice ◈ — nodes sampled from colour-keyed pixels, joined by lines to near neighbours. Nodes, Link distance, Links per node, Node size, Line width, Speed.
- Sky / Clouds ☁ and Ocean 🌊 — full generative scenes. Clouds use noise with domain warping (billowing, not flat cotton), perspective compression toward the horizon and a sun disc with halo. Ocean uses Gerstner waves with Fresnel sky reflection, a sun glitter track and foam on the crests. Both have Amount, so you can blend them over existing footage instead of replacing it.
Image effects
Brightness/Contrast · Hue/Saturation · Levels · Blur · Sharpen · Glow/Bloom · Invert · Posterize · Mono/Threshold · Pixelate · Vignette · RGB shift · Scanlines/CRT · Noise/Grain · Edge detect · Tritone · Fire · Wave/Ripple · Twirl · Radial blur · Text, plus ⭐ v0.9.34 Kaleidoscope · Bad TV / VHS · Halftone · Polar / Tunnel · Lens distortion · Anamorphic streak · God rays.
- Chroma Key and Luma Key for keying, now with Spill suppression ⭐ v0.9.34 — removes the green/blue bounce the key leaves on hair and shoulders, with an optional re-tint toward the background colour.
- Color LUT ⭐ v0.9.34 — load .cube 3D LUTs (the standard interchange format for colour grades): drop the cubes into the LUT folder next to the program, then pick one from the effect's list and set Intensity. Sampling is texel-centre corrected and trilinear, so blacks and whites stay put and there is no banding.
Titles — the speaker's name, made readable ⭐ v0.9.65
The Text effect stopped being a single line of white letters. It is now the thing you put a speaker's name in, five minutes before they walk on.
- Several lines. Press Enter in the text field and you get a second line — name on top, role underneath. Wrap width breaks a long line by itself at the percentage of the screen you give it (0 = break only where you pressed Enter), and Line spacing tightens or opens the block.
- Readable over anything. Outline with its own colour, a Shadow you offset in X and Y, and a Backing plate with its own colour, opacity and padding. White letters on a bright shot are invisible, and the shot under them is usually chosen after the title — that is the whole reason these three exist.
- Bold and Italic on top of the font you pick.
- On the matrix too. A title now travels with a MATRIX route, not just with a program layer: put it on a source and every screen that route feeds carries it. Until v0.9.65 the effect card was there and nothing appeared on the wall.
Animate it freely. A title is drawn once and then reused: moving it or turning it on keyframes costs the show nothing measurable, because position and rotation are applied when the title is placed on the frame, not when its letters are drawn. Changing the text, the font, the size or the outline is what redraws it — and that happens once per change, not once per frame.
Audio-reactive parameters ⭐ v0.9.35
Right-click any effect parameter's fader and an audio row appears. The chip cycles OFF → LOW → MID → HIGH → LVL — the frequency band that will drive the parameter (bass 20–250 Hz, mid 250 Hz–2 kHz, high 2–16 kHz, or the overall level). Next to it a live bar shows that band so you can see the value breathing, and an amount slider sets how far it moves. The amount can be negative — then the parameter ducks on the beat instead of jumping, which is often the better look.
- The analysis follows the master mix — what is actually audible. A muted or soloed-out layer contributes nothing, which is what you want when only one track should drive the visuals.
- Attack is fast and release is slow on purpose: a kick lands on the frame, and the parameter settles smoothly instead of chattering.
- Modulation is added when the parameter is evaluated, never written into it. So nothing is saved to the project while the music plays, Undo stays clean, and silence returns the parameter to exactly the value you set. Keyframes and audio can be used together — audio rides on top of the animated value.
- The row is hidden until you right-click, so cards stay readable; once a link is active it stays visible so you can see and remove it.
ISF — your own shaders ⭐ v0.9.34
VIIY runs shaders in ISF (Interactive Shader Format). Drop .fs files into the folder shown in SETUP → Effects → ISF SHADERS ⭐ v0.9.39 (the page moved out of Project), press Rescan, and they appear in the effects library under a separate ISF section with their parameters turned into normal sliders, colour pickers and dropdowns — keyframable and MIDI-mappable like any built-in effect. GLSL is translated to the GPU's native shader language on load; float, bool, enum, colour and point inputs are supported. Multi-pass shaders run too ⭐ v0.9.74: a shader may declare PASSES with named TARGET buffers, read them back in later passes, size them with the usual "$WIDTH/4" expressions, and mark them PERSISTENT so their contents survive into the next frame — which is what feedback, motion trails, fluid simulations and reaction-diffusion shaders are built on. Each effect on each layer keeps its own buffers, and they are freed again when the effect is not used. Up to 8 passes and 8 texture slots per shader; audio-input shaders are still rejected, with the reason shown in SETUP, so a shader never fails silently. VIIY ships no third-party shaders — the folder is yours.
The assistant knows this dialect ⭐ v0.9.74 — VIIY ships a small pattern library that the built-in AI (and any connected MCP client) reads before it writes or explains a shader: a machine-generated description of what this build supports, plus worked examples for frame history, separable blur, reaction-diffusion, half-resolution bloom, a pure generator and the metadata that turns inputs into controls. The examples are ours, written for VIIY — no third-party shader code is shipped or fed to the model. You can add your own: SETUP → Effects → AI PATTERN LIBRARY → My patterns, and a file named like one of ours replaces it.
And it can write one ⭐ v0.9.74 — ask for an effect in words and the assistant builds it. The shader is compiled in a sandbox first: if it does not build, nothing is written and the compiler's full text goes back to the model, which fixes it and tries again. When it builds, the file lands in your shader folder with a provenance header (model, date, your request) and appears in the effects library. It is never put on air by itself — you place it on a layer. VIIY asks for confirmation before writing, because overwrite replaces a file of yours, and rescanning the library restarts the frame history of ISF effects currently running. Loops without a bound, and loops whose bound is an input the operator can drag, are refused before the shader is even compiled — but those are filters, not a safety proof: the rehearsal rule above still applies to generated shaders, doubly so.
MATRIX ⭐
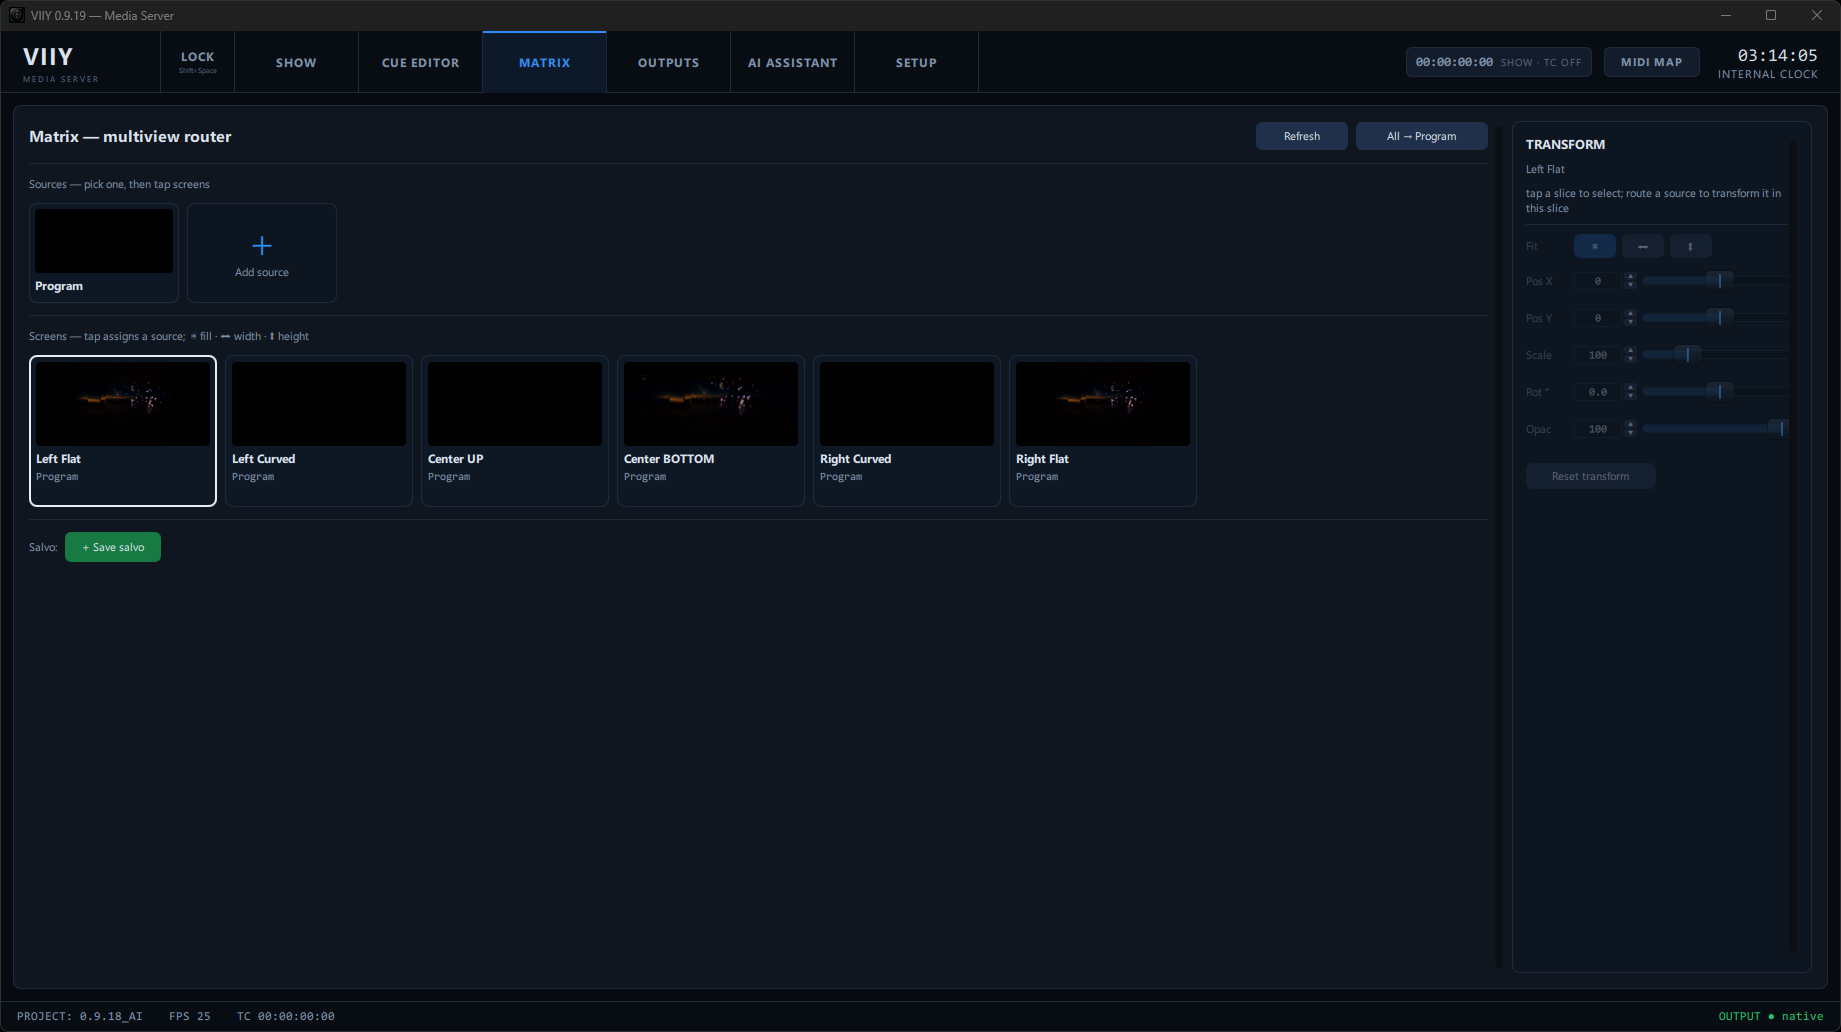
A live "source → slice" overlay router — F3, the third tab. A route lays a live source (station logo, camera, identity) on top of the program on a chosen slice, independent of the cues.
Sources
- The pool starts empty (Program + + Add source). Add source ▸: Add from PROJECT (files already in the bin — already HAP/prepared) · Add Solid (colour picker) · Add Timecode ⭐ v0.9.52 (colour picker) · Add Live ▸ (cameras / DeckLink / NDI / Spout).
- Timecode on a screen ⭐ v0.9.52: a source that draws the running
show timecode as
HH:MM:SS:FFon a transparent background, so it lays over the content like any other route — send it to the stage monitor, the conductor's screen or a rehearsal feed. It is the same clock that feeds the ACTION page, so the screen in the room and the stage manager's screen can never drift apart; the frames are counted from the project fps. When the timecode is off or the signal is gone it shows--:--:--:--— deliberately, because frozen digits look like a working timecode and the crew would notice the loss too late. The digits are drawn as seven-segment shapes rather than a font, so they look identical on any machine (Windows ships no seven-segment font). Colour is picked when you add it, and can be changed later: right-click the card → Timecode colour… (the same menu offers Solid colour… for colour sources). Scale and position come from the TRANSFORM panel, like any route. - Each card has a live preview and an arm toggle; click a card to arm it, tap a slice to route.
- Source duplicates (iid) ⭐: adding the same source twice gives "USB CAMERA" and "USB CAMERA #2" — they share the decode but have separate identities, so the same camera can sit on two slices with different transforms.
- Right-click a card: Remove; Timecode colour… / Solid colour… for generated sources ⭐ v0.9.52; for a DeckLink card also the deinterlace mode.
Slices & the TRANSFORM panel
- Tap a slice to route the armed source onto it (white frame = selected). The route is an overlay over the program crop, not a replacement.
- A permanent right panel with three tabs — Controls · Effects · Live — the same panel the CUE EDITOR uses for a layer, bound to the selected route. Controls = route transform (Position X/Y · Scale · Rotation · Opacity · Fit fill ▣ / width ⬌ / height ⬍ · Reset; the default is a clean fit) plus the effect cards. Effects ⭐ = the full effect library on the route itself: add / reorder / tweak — the chain renders on the output, per source+slice instance (the same camera on two slices can carry two different chains). Route effects are static (no keyframes — there is no playhead here). Live = the live-input list; clicking one adds it to the pool and routes it onto the slice in one tap.
- The master video fader dims MATRIX too; BLACKOUT kills everything.
- All → Program resets every route. Preset: Save preset stores the current routing; recall brings it back with one tap (bound by slice identity, not index).
- Entering the tab refreshes the camera list. After loading a project the routes are neutral (a camera does not "hang" by itself) — recall a preset manually.
OUTPUTS — mapping
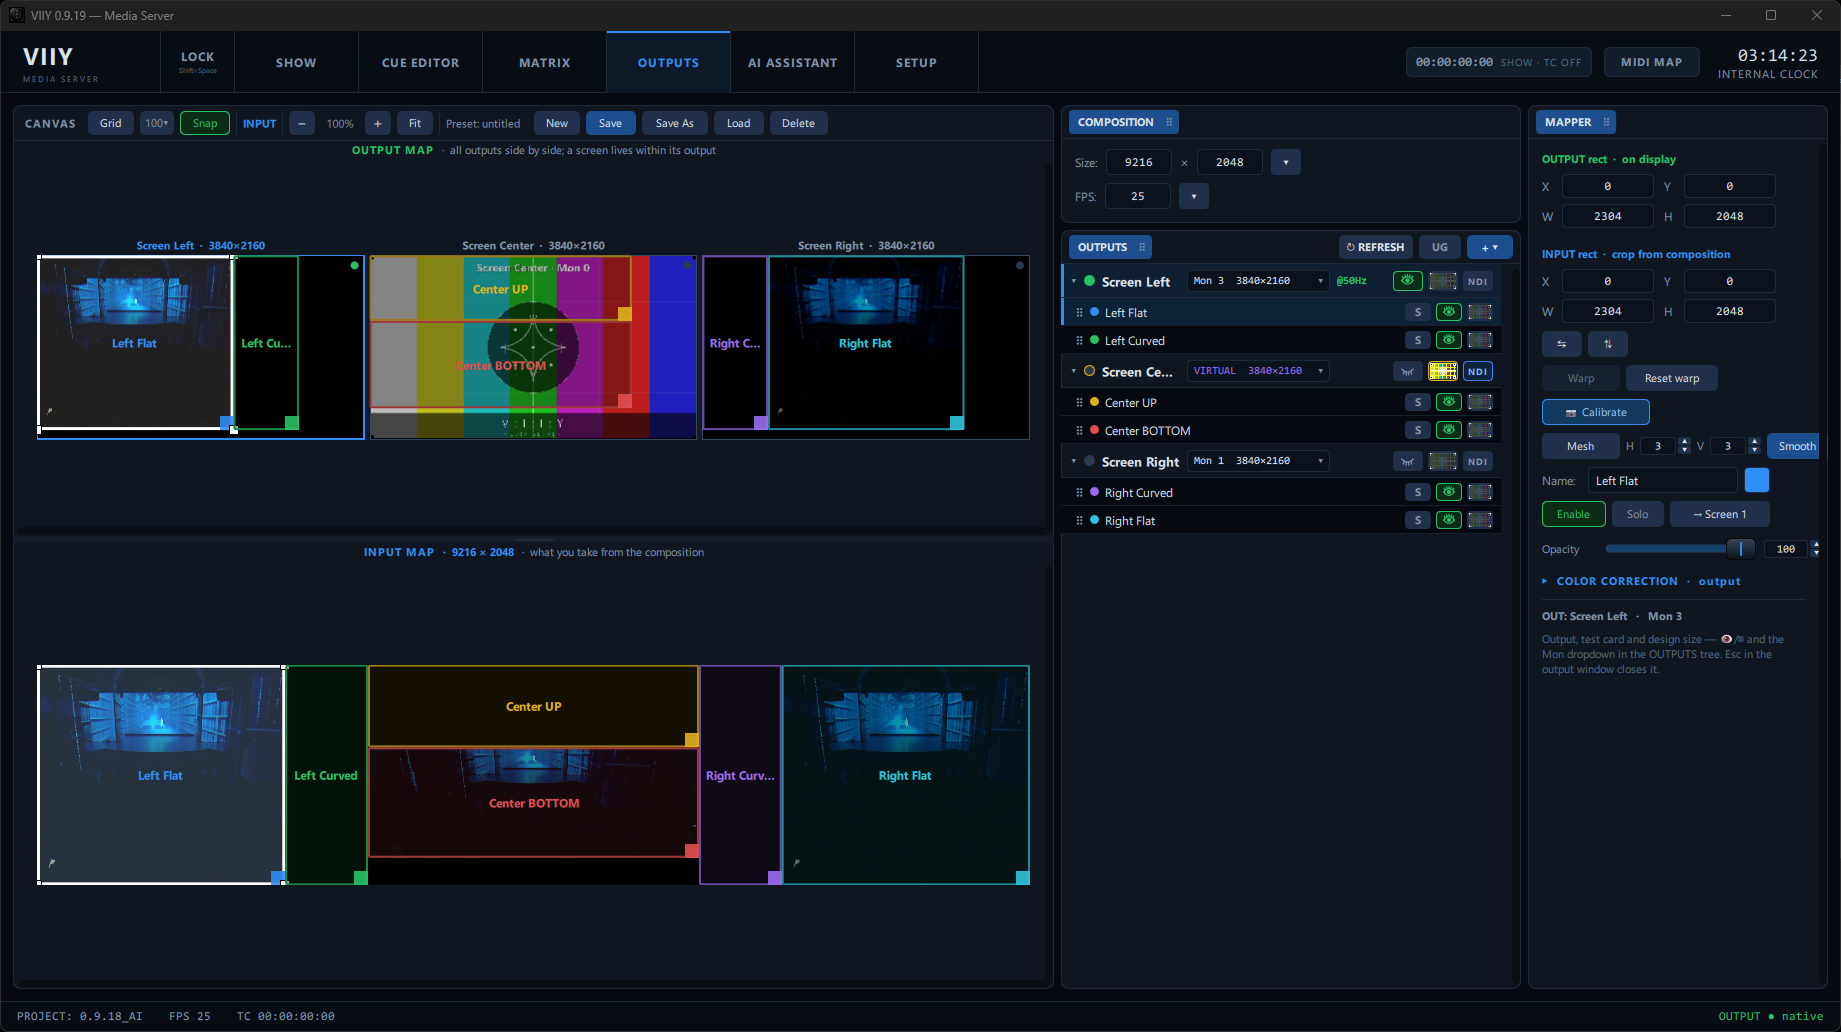
The mapping model: outputs (physical/virtual displays, named OUT N by default) → slices — the "screens" of the show (the TO SCREEN buttons and MATRIX route onto them). Input Map = what a slice takes from the composition; Output Map = where it puts it on the output. Both maps are shown at once, stacked in a vertical split.
A show with no outputs ⭐ v0.9.75
You can now remove every output, including the last one — the menu item says what will happen
(Remove OUT → default map). What you get back is the default map: one VIRTUAL output
at the design resolution with one screen covering the whole composition, exactly what a new project
starts with. Your composition is untouched — cues, layers, media and canvas size all stay as they
were; only the outputs are reset.
Before v0.9.75 the last output simply refused to go: the menu item was greyed and the row stayed, with nothing to explain why. Clearing the outputs to build a map from scratch is a normal thing to do, so it now works — and lands in a defined state instead of the leftovers of what you deleted.
Which one am I editing — the OUT or the SCREEN? ⭐ v0.9.64
An output and a screen are different objects with different settings, so the MAPPER panel shows one of them at a time and says which:
- click an OUT row → the panel is headed
OUT CENTR · OUTPUTand holds the output's own settings: the device it goes to, size and refresh rate, its name, whether it carries the composition or the crew page, and whether it is open, live or frozen; - click a SCREEN row → the panel is headed
CENTR · SCREEN in OUT CENTRand holds the mapping: input/output rectangles, rotation, warp, mesh, mask, calibration, opacity, colour correction and edge blend; - in the tree, the selected row is bright with a blue bar; the output that merely contains the selected screen is dimmed — it is context, not your selection.
Before v0.9.64 both rows lit up the same way and the panel always showed the screen, so its fields read like output settings. If you are used to looking for the device or the design size here — they live on the OUT page now (and, as before, in the Mon dropdown in the tree).
❄ FREEZE — hold the picture while you rebuild under it ⭐ v0.9.64
❄ FREEZE in the OUTPUTS toolbar, next to IDENTIFY, holds the last frame on every open output while you change cues, layers or mapping. Click again to go live.
- The whole output freezes, not the window on your desk. SDI, NDI, Spout and the pixelmap hold the same last frame, because they all read the same finished frame the screen does.
- The state is not saved with the show — it is a move you make for a minute, not a property of the venue. Reopening an output (changing its monitor, size or colour depth) also clears it.
- A freeze is written to the show journal, so it is visible afterwards in
show.log.
Two canvases at once ⭐
- OUTPUT MAP (top) — all screens side by side: each SCREEN is a frame with its own name / resolution / status, laid out left to right (a bird's-eye view of the whole wall). Slices are editable right on the screens (drag / resize / warp). Slices can be dragged between screens.
- INPUT MAP (bottom) — the composition with each slice's crop rectangle.
- The two panes are separated by a draggable splitter whose height is remembered.
Canvas toolbar
- Contextual zoom at the very top: − / % / + / Fit and the mouse wheel (15%–1600%); pan with the middle button or the scrollbars. The zoom targets the active canvas — the one whose slice you last touched — with an OUTPUT/INPUT indicator.
- Grid + 100 ▾: grid step in space pixels (1/5/10/50/100 or a custom value), grey lines; Snap magnetizes to edges/centre/quarters, other slices and grid lines.
- Layout presets .viiymap (New / Save / Save As / Load / Delete) — all screens + slices together.
Slice editing
- A slice drags by its body; 4 corner handles resize it (the opposite corner is the anchor; on very small slices the handles move outside the corners so they don't clump). Move and resize are clamped to the space bounds — the frame is always visible.
- The selected slice has a white frame + white veil; the rest are coloured frames. A focus mode is available (the selected slice is a matte, the others are dimmed). In Output Map with Warp the corners become yellow corner-pin handles.
SCREENS tree
- Header: UG (User Guides, see below) · + ▾ (Add screen / Add slice / Duplicate / Remove) · ↻ REFRESH ⭐ (re-reads the refresh rate of the open outputs).
- Output row: ● status, a collapse triangle, the name (double-click to rename), and a single
Device menu ⭐ — one dropdown decides where this output goes:
VIRTUAL (design-size canvas, see Virtual outputs) · every physical
monitor (one used by another output shows "— busy") · every SDI connector of installed
Blackmagic DeckLink cards (an SDI device taken by another output is marked busy) ·
every AJA card ⭐ v0.9.61 (KONA / Io / T-TAP, listed as
◆ <card> (AJA)— see AJA cards) · NDI (broadcast into the network, NDI OUT) · Spout (share the output as a GPU texture to other apps on this machine). The same content on two SDI/NDI destinations = simply a second OUTPUT. Then the@50Hzbadge (green = a clean multiple of the project FPS, tolerant of fractional rates such as 99.96→100), 👁 output ON/OFF, ▦ a full-monitor test card.
⚠ Two identical monitors ⭐ v0.9.48 — a normal case with a pair of matching projectors, or with screens that have no vendor driver (Windows calls them all the same thing). Outputs are addressed by the monitor's position, not its name, so the refresh rate can no longer be applied to the wrong one. If a name is genuinely ambiguous, VIIY leaves every mode untouched and says so in the log: changing nothing is cheaper than changing the wrong output. - ACTION output ⭐ v0.9.44 — a screen of a different kind: it shows the show (what is on air, what is next, the events coming) instead of the picture, and reads no composition at all. Added from + ▾ → 📋 Add ACTION screen; it then behaves like any other output — monitor, NDI, SDI or a separate node. Selecting it replaces the MAPPER panel with its own: Text size 50–200 %, Rotation 0/90/180/270, and the show-wide event rules (which events to show, preroll, keep past). Full description: ACTION screen.
- Slice row: ⠿ drag order (z), a colour dot, the name, S global SOLO, 👁 slice ON/OFF, ▦ a test card in the slice. An inactive ▦ is dimmed into the UI tone.
Auto-VIRTUAL — a dead receiver no longer stops the show ⭐ v0.9.39
If a display or LED processor stops answering (power cut, a broken chain) or the cable is pulled, the output falls back to VIRTUAL by itself — it is not closed. Rendering continues headless, the OUTPUT PREVIEW thumbnail stays real, and the other outputs and the desk keep running: before v0.9.39 a receiver that held its EDID but stopped taking frames could freeze the whole interface.
- The output row shows an amber ⚡ Return Mon N chip, and the SHOW ▸ OUTPUT PREVIEW thumbnail shows a ⚡ VIRTUAL badge — the badge is the button. One click puts the output back on its monitor, matched by monitor name, so re-plugging into another port does not matter.
- If the receiver is still dead the output simply drops back to VIRTUAL; the show is never held hostage to it. Picking a device by hand in the Device menu clears the chip.
- Ordinary monitors switched off at the front panel keep their EDID and keep taking frames — nothing to react to, and nothing changes. The fallback is for a receiver that has genuinely stopped.
MAPPER panel (selected slice)
- INPUT / OUTPUT rect X·Y·W·H (numbers). Grid · step ▾ · Snap · mirrors ⇆/⇅ · Warp (Output) · Reset warp · Mesh ON + H/V + Smooth (Mesh warp ⭐) · 📷 Calibrate (Camera calibration ⭐) · "Photo" (the scan underlay) · Name.
- Enable · Solo (global: mutes all other slices on all screens; a screen with no visible slices is black) · → Screen N (move the slice).
- Opacity + COLOR CORRECTION of the output (collapsible): Gamma, Gain R/G/B, Lift R/G/B, Temp, Tint. All values are editable numeric fields.
- Slice MASK ⭐ — an additive mask that clips the slice's output without touching warp / mesh / colour: draw freeform lines on the canvas, or drop a primitive (△ triangle · ⬡ octagon · ◯ ellipse) and adjust; Clear removes it. Useful for cutting a slice around set pieces or blending odd-shaped surfaces.
- POLY slice ⭐ — a slice as an N-vertex polygon instead of a rectangle: + ▾ → Add poly (starts as a regular hexagon). Vertex handles are draggable in both views — input (what part of the canvas is sampled) and output (where it lands on the screen), vertex-to-vertex; the −N+ spinner adds a vertex on the longest edge / removes the shortest. v1 supports convex polygons; warp/mesh stay rectangular tools. The User-Guides frame on the physical output follows the polygon outline.
Two rotations — and which one you want ⭐ v0.9.51
A slice has two rotation controls, and they are not variants of each other. Picking the wrong one is the single easiest mistake in this panel, so the short version first:
- The whole screen is mounted sideways (a portrait monitor, a LED wall turned on its side) → OUTPUT rotation. The input selection stays a plain landscape rectangle.
- Individual panels are hung at an angle and tiled next to each other on one output → INPUT rotation. Rotating the output there would make the neighbouring boxes overlap.
OUTPUT rotation — a screen mounted sideways ⭐ v0.9.51
Rotates how the content lands on the screen, leaving the input selection alone: the slice keeps taking a normal, axis-aligned landscape region from the composition.
- 0° · 90° · 180° · 270° only — and they are exact. It is done by re-assigning the corners, not by resampling, so nothing is softened and the output box stays where you put it — a rotated box would stick out past its own monitor and overlap its neighbours.
- 90° and 270° swap the output rect's W↔H automatically. A quarter turn changes the orientation of the content, and a box that stayed landscape would squeeze the now-portrait picture into itself. X/Y stay where they are. Turning back swaps it back; 0↔180 and 90↔270 change nothing, since those keep the orientation.
- Mask and mesh do not rotate with it — they belong to the physical surface, not to the content lying on it.
INPUT rotation — for tilted LED ⭐ v0.9.44
Rotates what the slice takes from the composition, not where it lands on the output. The case it exists for: a LED panel hung at an angle, or several panels turned on their side and tiled across one output — you keep composing straight and let each slice pick its content rotated.
⚠ For a whole screen standing vertically, use OUTPUT rotation instead. A full-frame 1920×1080 selection simply cannot be turned 90° and still fit inside a 1920×1080 composition — the rotated rectangle hangs off the top and bottom, and everything outside the composition is empty (see below). That is not a defect, it is arithmetic.
- 0° · 90° · 180° · 270° — buttons, and they set exact values: a quarter turn is exactly 90, never 89.99848, so the picture never sits a hair off true.
- free — any angle, including negative ones (a panel tilted counter-clockwise is
-8, not352). The field also scrubs with the mouse. - At 0/90/180/270 the selection itself is not turned at all — only its contents are ⭐ v0.9.51. A rectangle turned by a quarter is still axis-aligned (626×1080 rotated 90° is 1080×626), so there is nothing to rotate geometrically: the slice takes exactly the rectangle in the fields and the picture inside it comes out turned. The numbers therefore always describe the frame you see — W changes the visible width, H the visible height, and nothing drifts sideways.
- A free angle is a genuinely tilted region, so there the rectangle is rotated — around its centre, in composition pixels (a rectangle stays a rectangle on a non-square composition instead of coming out skewed). Changing its size there also moves it, because the centre moves; that is inherent to turning a rectangle, not a defect.
- It works under mesh and warp, and mirrors ⇆/⇅ rotate together with the selection — you mirror what you see.
Why this changed ⭐ v0.9.51: the fields used to
describe the rectangle before rotation while the canvas and the engine drew it after,
turned about its centre. At 0° the two coincide, so nothing looked wrong — at 90° they came apart:
W became the visible height and the centre (X + W/2) drifted, so one number moved two
things at once. Quarter turns no longer rotate any geometry, which removes the mismatch at its
source rather than compensating for it.
Honest limits — free angles only. Quarter turns behave exactly like 0° now, so none of this applies to them. At an arbitrary angle the slice's hit area stays an unrotated rectangle, so you may have to aim slightly off the corner; the resize handles are caught where they are drawn, but the drag deltas are not rotated. POLY slices ignore input rotation altogether (they carry their own geometry), and the canvas honestly does not rotate their frame either.
Outside the composition there is nothing ⭐ v0.9.51: where a rotated or oversized selection reaches past the composition, the output shows empty, not a smeared edge pixel. Earlier the sampler clamped and painted the last row or column into a stripe — content that does not exist anywhere. Empty tells you the truth: narrow the INPUT rect, or use OUTPUT rotation.
COMPOSITION panel
Size (WxH + presets) and project FPS (field + chips). Changing the FPS automatically switches the output monitors' refresh to a clean multiple (25→50 Hz, 30→60).
AI ASSISTANT — the Showbuilder ⭐
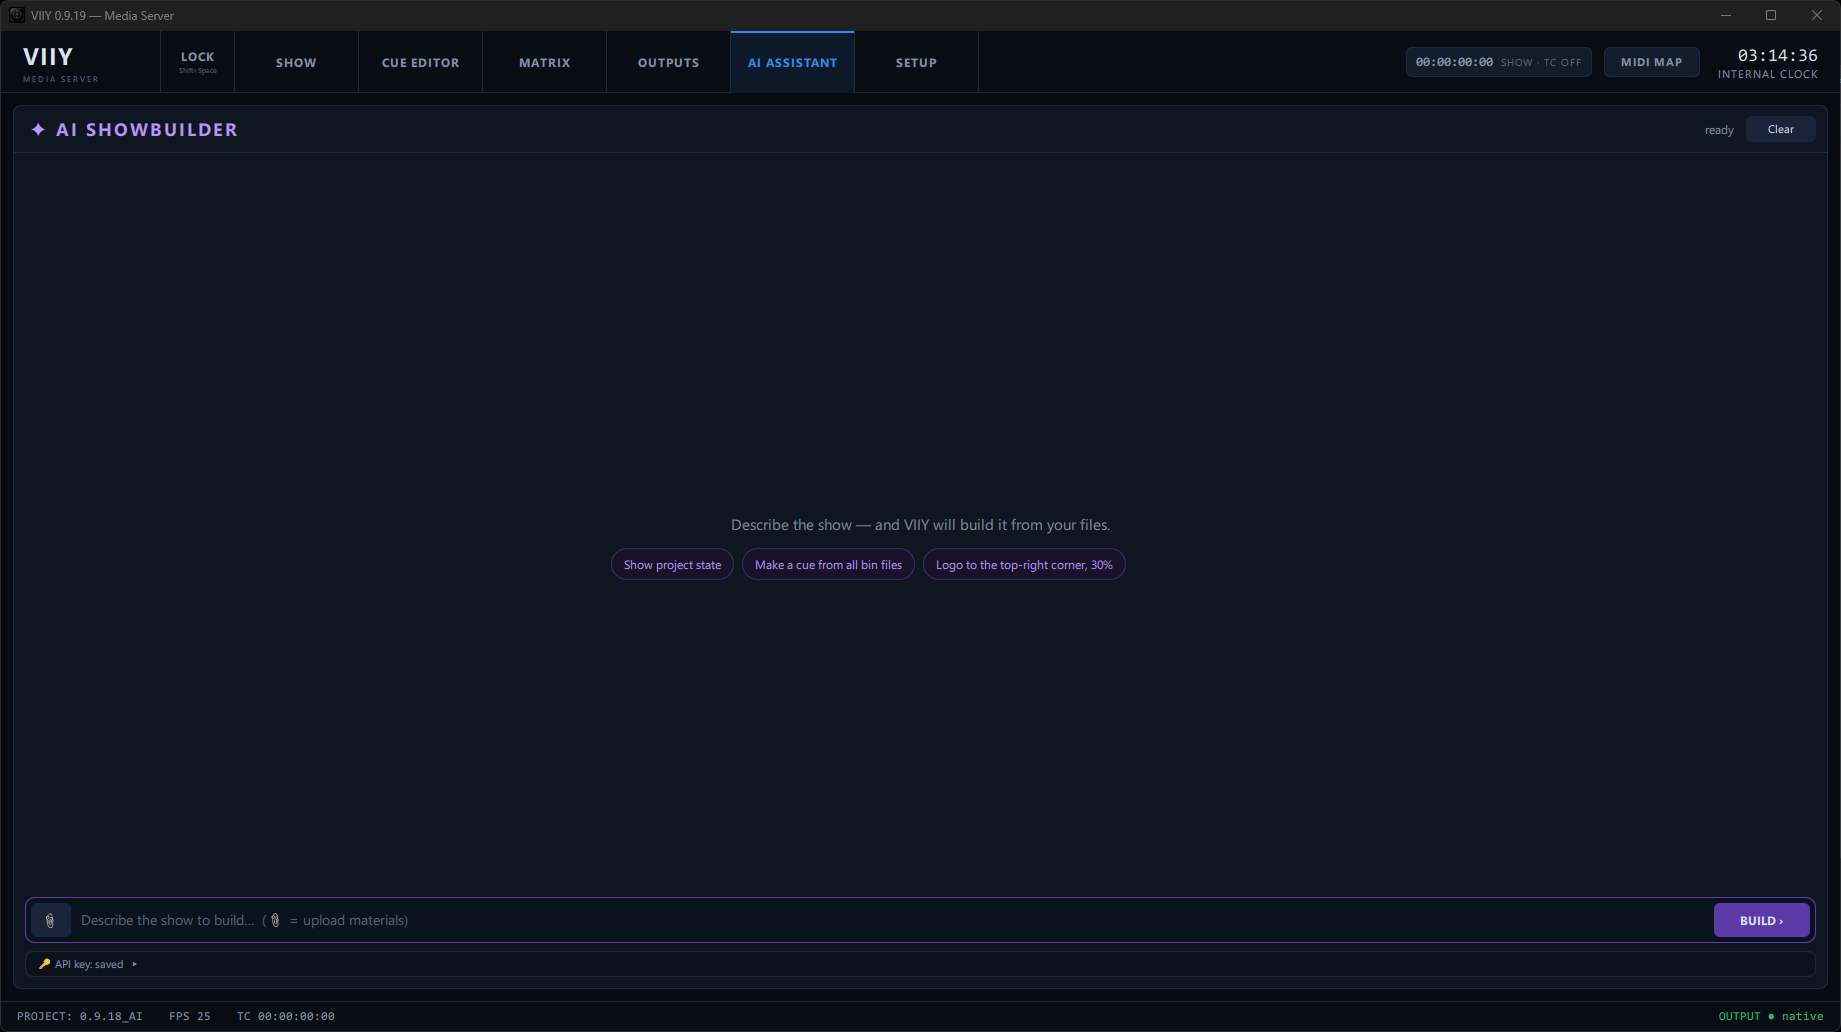
A chat tab with an AI agent (Anthropic API; the 🔑 API key control is at the bottom of this tab, under the input box; the agent replies in your language). The same conversation is duplicated by a compact panel on SHOW (with its own 📎). It does not just chat — it builds the show through a catalogue of real tools: inspect the project state / media / cues / screens, create and fill cues, set the canvas, build screens and slices, route the matrix.
Upload materials 📎
- The 📎 button is a menu: Files… attaches PDF / images / txt / csv (stage plans, setlists, timecode sheets, photos) — they appear as chips (✕ removes) and go to the model as real documents; Folder of videos… ⭐ scans a folder recursively, imports the footage into the PROJECT bin and tells the assistant what arrived — the fastest way to hand it a whole show's worth of content. Attachments live in the conversation, so you can send them in parts (the timecode sheet first, the stage plan later) and keep asking questions. A comment typed next to an attachment is sent together with it. Files are copied into <project>/ai/.
- The launcher's New Project flow opens the AI tab with the materials dialog straight away.
What it can build
- Timecode sheet → setlist: "Create a cue per song with its timecode" → empty named cues with marks in the CUE LIST, ready for TIMECODE chase.
- Stage plan (PDF) → mapping: canvas size + outputs with slices (created as VIRTUAL — no monitors needed while designing). The agent states its plan in one line first; if you did not describe the structure, it asks before building — your words beat the document.
- "Put the media into the cues": fills existing cues by matching file names to cue/song names (cue length = the longest file).
- An updated setlist updates existing cues by name (no duplicates).
- Full cue-list management ⭐ v0.9.33 — the agent can also delete, duplicate and reorder cues, and edit the layers of a saved cue without wiping it: "add the logo on top of every song" adds a layer above the existing ones (fill only replaces when you ask it to fill), "remove the second layer from cues 3–5" removes exactly that.
Confirmation gate — the agent asks before it overwrites ⭐ v0.9.39
Anything that overwrites or removes what already exists is held until you allow it: filling or updating a saved cue, deleting a cue, removing a layer from a cue, changing the properties of saved cues or layers, rebuilding screens or the canvas, and saving the project. An amber banner appears at the top of the window — 🤖 AI wants to: <what it is about to do> — with Allow all and Deny, visible from any tab, plus a line in the chat.
- Allow all covers the agent's whole current turn, not one call: a plan that touches twenty cues is confirmed once. The mandate ends when the turn ends (or on Reset).
- Deny rejects the queued calls and tells the agent not to retry but to ask instead.
- Adding and reading are never gated — new cues, new layers, duplicating, reordering and every inspect tool run straight away. That is the point of asking an assistant to do the work.
- AI restore points work independently of the gate — a snapshot is taken before a mutating run, so an unwise "Allow all" is still recoverable.
MCP — drive VIIY from any AI agent ⭐
VIIY ships a built-in MCP server (Model Context Protocol — the open standard AI clients speak). Any MCP-capable agent — Claude Code, Claude Desktop, compatible IDEs and assistants — can discover and call the same tool catalogue the built-in Showbuilder uses, plus operate tools: it can open a project, build screens and cues, route the matrix, select the timecode source, take cues to air, blackout, open/stop outputs and read the live output status. The catalogue covers the full cue-list lifecycle ⭐ v0.9.33 — create, fill, batch-edit, delete, duplicate and reorder cues, and add/remove single layers of a saved cue without rebuilding it.
The crew side is covered too ⭐ v0.9.45: an agent can list, add, change and delete events, import them from an editor's marker export (the same parser the LOAD button uses, so the operator and the agent read a file identically), import the show's cue timecode list, add and configure a ACTION screen (rotation, text size, event rules) and put a message on the crew screens. Slices accept input rotation for tilted LED. Until this version an agent could build a whole show and leave it without a single instruction for the stage manager — it saw cues, but not the events the show is actually run by.
One screen at a time, without rebuilding the mapping ⭐ v0.9.48: until now an agent could only rebuild the whole screen layout, so asking it to turn one tilted LED panel would have wiped the warp, mesh, blending and colour of the entire venue — which is why that job stayed manual. It can now edit a single mapper slice in place: input rotation, the canvas region it takes, the rectangle it lands on, which output it belongs to, mirroring, opacity, and switching the surface off. The edit undoes with Ctrl+Z in the mapper like any of your own, and it asks for confirmation — switching a surface off says so in plain words, because that surface goes dark. Warp, mesh, masks and colour correction are deliberately not exposed: those are set by eye, and one call should not be able to undo a venue you aligned by hand.
Enable & connect
- SETUP → 🤖 AI / MCP → MCP ON. Default endpoint http://127.0.0.1:7710 (localhost only — agents on this machine). The page shows a ready-to-paste connect snippet, e.g. claude mcp add --transport http viiy http://127.0.0.1:7710/.
- LAN mode opens the port to your local network and enforces a Bearer token (generated automatically; Regenerate any time). No token — no access.
The operator stays in charge
- Actions that touch the live air (take a cue, blackout, stop/open an output, switch the timecode source, open a project) pause on a global Allow / Deny banner until you tap it. The agent waits; a timeout denies it automatically.
- Auto-approve (SETUP toggle, off by default) lets a trusted agent run unattended — a persistent red banner reminds you the gate is lifted, with one-tap Turn off.
- Every mutating call writes a restore point first (AI snapshots — one-click rollback), and an external agent can never overwrite your saved show file silently: a main-file save always asks, even with auto-approve on. By default its saves land in <project>/ai/saves/ for you to promote manually.
SETUP redesigned ⭐
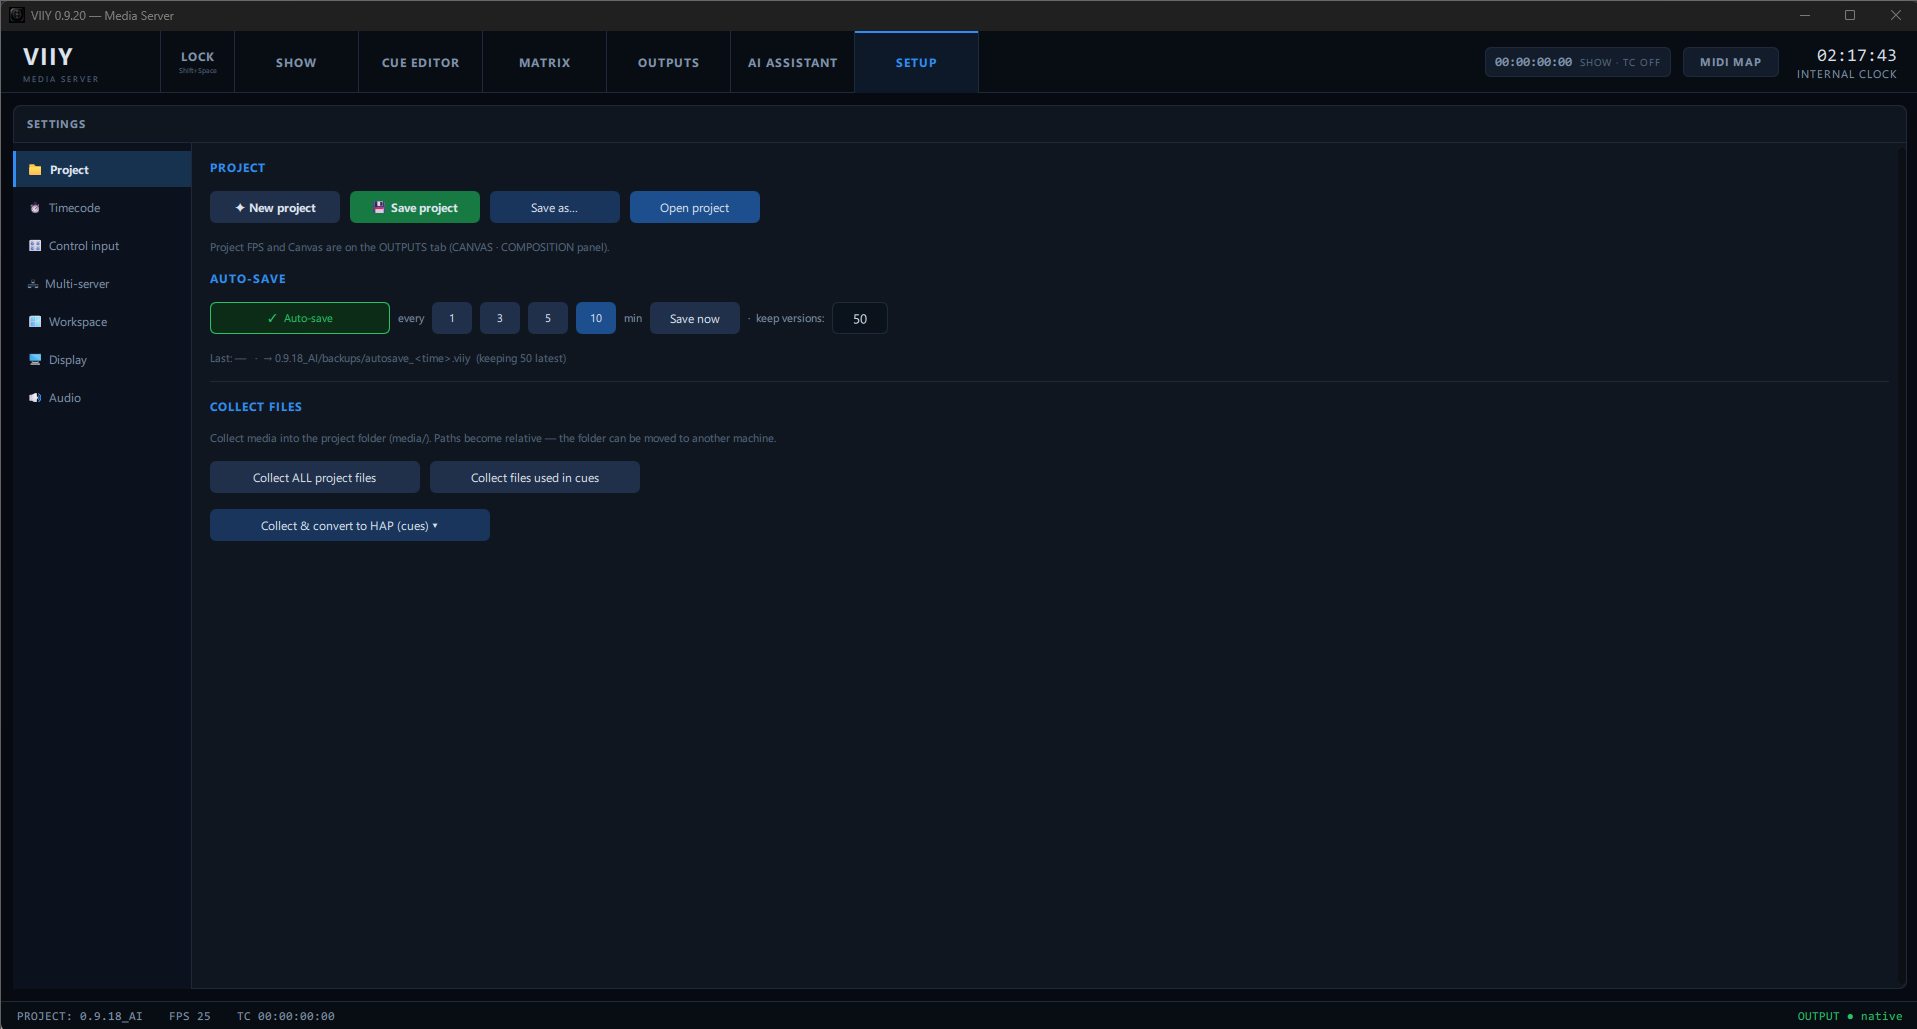
A left category list — pick a category on the left, only its settings show on the right. 10 categories:
- 📁 Project — New / Save / Save as / Open · Auto-save (interval 1/3/5/10 min, keep N versions → <project>/backups/) · Collect files (all / used-in-cues / Collect & convert to HAP → media/, paths become relative). Collect+convert shows two progress bars (overall % + files N/M, conversions run in parallel, a batch bar in the bin too) and asks one final "Replace all" instead of a prompt per file. ⭐ Also here: 🔗 Relink missing media… ⭐ v0.9.38 — see Relink missing media.
- ⏱ Timecode — the single Source dropdown (OFF / SHOW CLOCK / LTC / MTC) with the chosen source's properties. See TIMECODE.
- 🎛 Control input — MIDI CONTROL (universal learn), OSC IN (UDP port + addresses), OSC OUT ⭐ v0.9.61 (feedback to a Stream Deck or any controller), DMX IN (Art-Net :6454 / sACN :5568). See MIDI mapping · OSC · DMX.
- 🖧 Multi-server ⭐ — networked backup / failover. See Multi-server backup.
- 🪟 Workspace — save / restore the panel layout (Save/Load/Reset, "restore at startup").
- 🖥 Display — FPS badges (preview / physical outputs), Output VSYNC (ON = tear-free,
camera-safe), Diagnostics log (OFF = quiet; ON = verbose engine probes, ~31 MB over a 9-hour show),
and OUTPUT COLOUR DEPTH ⭐ v0.9.63 — see below.
The FPS badges start off with every project you open or create ⭐ v0.9.51
— a red
OUT 1 · 0 fpsin the corner of a live output is the last thing you want in front of an audience. Switch them on here whenever you need them; the choice holds until the next project is loaded. - 🔊 Audio — WASAPI master status, Master volume, Test tone, L/R VU meters. Output device — pick which sound device VIIY plays to (the system default is marked; ⟳ Refresh re-scans). Switching applies live, no restart, and the choice is remembered between runs; the status line shows the active device. ⭐ v0.9.32 LIP-SYNC ⭐ v0.9.64 — hold the sound back 0–500 ms so it lands together with the picture. See Lip-sync.
- 🎨 Effects ⭐ v0.9.39 — the ISF SHADERS folder (Open folder / Choose folder / Rescan / Use default) with the loaded-shader count and the reason for every rejected file. The page used to live under Project. See ISF — your own shaders.
- 🤖 AI / MCP — the built-in MCP server: an external AI agent drives VIIY with the same tools as the built-in assistant. Port, localhost / LAN + token, auto-approve for live-air actions, restore points. See MCP server.
- ✉ Feedback ⭐ — send a bug report straight from the app. Details below.
The Anthropic API key for the AI Showbuilder lives on the AI ASSISTANT tab, not in SETUP.
SETUP → 🖥 Display → OUTPUT COLOUR DEPTH ⭐ v0.9.63
Two buttons: Auto (10-bit) — the default — and Force 8-bit. VIIY writes every output in 10 bits per colour and drops to 8 only if the graphics driver refuses the format, which it says in the log.
What this is for. Banding in a projector overlap or in a long fade is usually blamed on the content, but it was born on the last step: the blend curve is computed at full precision and lost it when the frame was written to the screen. A deeper output gives that ramp four times as many steps. Your footage does not need to change — 8-bit HAP into a 10-bit output is a normal pair, and the same is true in other servers whose codecs are 8-bit by design.
- If the cable to that screen carries 8 bits you will not see a difference — the driver maps 10 → 8 well enough. That is expected, not a fault. The log line for each output says what the display carries, so you can tell one case from the other.
- SDI, NDI and Spout stay 8-bit for now: they read the finished frame by another path, each with its own converter. Separate work, not an oversight.
- Force 8-bit is the first thing to try if one particular screen misbehaves on a 10-bit output — and it is what we will ask you for in such a report, because it isolates the format from everything else in the same build.
- Changing this reopens the outputs: the format is fixed when an output is created and cannot be changed while it runs. The setting lives with the machine, not with the show — the same show file travels to a venue with different screens.
Measured, not assumed: on a paused heavy cue (58 layers, three outputs, the same frame, the same build) 10-bit and 8-bit came out level — CPU drifted 44–53 % of a core in both, and the counter on the physical output read 24–26 fps in both. That is why it is the default now.
SETUP → ✉ Feedback — send a report ⭐
Name (required) · Email (optional — only if you want a reply) · what happened (10–1950 characters, counter under the field) → ✉ Send report. It goes straight to the VIIY team: no account, no mail client, no visit to the website.
ATTACH LOG is the point of this form. VIIY attaches the log itself — you never have to find the file, and its location depends on where the installer put the app.
- This session — the log of the current run (viiy.log).
- Previous session — the log of the previous run (viiy.log.1). ⚠ Pick this one if VIIY was restarted after the problem: every launch starts the current log from scratch, so the evidence is in the previous one.
- Don't attach — send the text only.
- Show in Explorer — open the file first if you want to see what you are sending.
Size is not a problem: a log above 15 MB is not rejected but trimmed from the head — you send the tail, where the failure is, with a note about it on the first line. The VIIY version and your Windows version are appended automatically; we won't ask you for them.
Logs are received privately: they are visible to the VIIY team only and are never published. Up to 5 reports per hour from one connection — that limit is against spam, not against you.
Multi-server — backup, sync & render-node ⭐
Two (or more) VIIY machines on one LAN, with a role each. A Master runs the show; a Backup takes over if the master dies; a Node (render-node) drives only some outputs on its own hardware. All controls are in SETUP → 🖧 Multi-server — the panel shows only the controls for the role you pick (Master = sync + output assignment; Backup = receive + follow + failover; Node = receive + follow). Wire the machines to the screens (parallel or through a switcher). Ports: UDP 7700 (discovery) + TCP 7701 (file transfer).
- Both machines: ▶ Network ON — they discover each other (same subnet, multicast). The peer list shows role, show-match ✓/≠, current cue and heartbeat age.
- Role: Master on the main machine, Backup on the spare. Name each machine.
- Backup: Choose… a local receive folder → "● receiving :7701"; Follow master ON; Auto-failover ON → Return to standby (outputs dark, backup warm).
- Master: ⟳ SYNC → backup → a dialog: prepare files (Push as-is / Collect / Collect+HAP / Collect+HAP Q) + what to send (Changed size+date / Verify hash / Everything). Start → the whole show (media + .viiy) copies over the network and the backup auto-opens it. A re-sync after edits sends only changed files (seconds). A dropped link auto-resumes; ✕ Cancel aborts.
- Running: drive the show on the master — the backup mirrors it live (GO cue, playhead, play/pause, blackout). For frame-exact sync, put both on TIMECODE off the same LTC/MTC clock.
- Failover: master gone (heartbeat lost >2.5 s) → the backup lights its own outputs + a red MASTER LOST banner on every tab. Failback is manual (Return to standby) to avoid flicker if the master blips; a returning master raises a hand-back hint.
BACKUP indicator — is the backup holding the same show? ⭐ v0.9.40
A BACKUP chip sits in the top bar of the master, on every tab. It does not answer "is the other machine online" — it answers "does the backup hold the same show", by counting the actual files the receiver is missing. A machine can be perfectly alive and still hold yesterday's show; that is the failure this chip exists to catch.
| Chip | Meaning |
|---|---|
| IN SYNC | every receiver holds exactly the files the master has |
| N FILES BEHIND | that many files are missing or different — the tooltip names them |
| 2/3 IN SYNC | some receivers confirmed, others have not answered yet |
| NO RECEIVER | no backup or node is receiving on the network |
| % SENDING | a transfer is running (measured in megabytes, not file count) |
| PIN NOT PAIRED / BACKUP DISK FULL | the receiver refuses: wrong PIN, or no space for the show |
- Click the chip = SAVE & SYNC: save the project, then send the changed files to every backup and node in turn. Right-click opens the full SYNC dialog (collect media, verify by hash, resend all). The same 💾 SAVE & SYNC button sits in SETUP → Multi-server.
- Report in one line: Main saved · Backup synced 14 s ago · 3/3 ready.
- Click while sending = stop. Files already delivered stay on the receiver: the next sync continues from where it stopped instead of starting over. On the receiving machine there is now a ✕ Stop receiving button — accepting a show is not an obligation.
- No space on the receiver? It refuses before writing anything and says the numbers (12 files need 40 GB, only 3 GB free) instead of dropping the connection and being retried blindly.
- The check is silent: it writes nothing on the receiver and never re-opens the show there, so it is safe to leave running mid-show. PREFLIGHT reports the same thing before doors.
Pairing PIN — what the receiver shows ⭐ v0.9.40
The master generates 4 digits (New PIN); you type them into every backup and node. The receiver now tells you where you stand instead of staying silent until the first transfer:
- ◐ CONNECTING… (blinking amber) — digits accepted, the receiver is listening, no master yet.
- ● PAIRED (green) — a master really passed authentication; its address is shown next to it.
- ✖ WRONG PIN (red) — someone connected with different digits: the PINs have drifted apart. That is a digits problem, not a network problem.
The show is shared, the hardware is not ⭐ v0.9.41
Everything that is the show travels with SYNC and must be identical everywhere: cues, layers, media, timecode, transitions, effects — and the mapping geometry (warp, mesh, blend, colour correction). The projectors and the surfaces are the same whichever server feeds them, so after a takeover the picture has to land in exactly the same geometry.
What is not shared is which physical socket carries which output. Monitors are numbered differently on every machine, a backup may have no DeckLink at all, and a camera enumerates under a different device path on every computer. So each machine keeps its own binding:
- Outputs — on a backup or a node, the device chip in OUTPUTS writes to this machine's binding instead of the show. The menu says so (▪ local to this machine), the chip marks a bound output with ▪, and ↩ Follow the master's choice gives it back. A SYNC from the master does not wipe it.
- Live inputs — in MATRIX, right-click a camera tile → Bind to a device here picks the input as this machine sees it. Without it a camera routed on the master would simply be black after a takeover, because capture:// and decklink:// identify a socket on that computer. NDI and Spout sources need no binding — their names are the same everywhere.
- Machine settings — audio device, timecode input, DeckLink deinterlace, MIDI map, network role and PIN were already local: they live in the config, not in the project.
Render-node — split the wall across machines ⭐
A Node drives only some of the physical outputs — e.g. the master runs LEFT/CENTRE/RIGHT while a node runs a 4th screen on its own hardware. The whole show lives on every machine (sync first); each node opens only the outputs assigned to it and follows the master's transport. This scales one show across several machines when a single PC can't drive every screen.
- Node machine: Network ON → role Node, name it, choose a receive folder, Follow master ON.
- Master → RENDER-NODE — output assignment: per physical OUT pick which machine drives it — This machine (local) or a discovered node by name. An OUT handed to a node is no longer opened by the master; only the node drives it (on the node's own monitor / SDI). The who renders choice (here) is separate from the where it goes device picker in OUTPUTS (monitor / SDI / NDI on that machine).
- Master: ⟳ SYNC → the show copies to the node, which auto-opens it and lights its assigned outputs.
- Preflight: each backup/node reports media completeness — the master's peer list shows ✓ media or ⚠ MISSING media before you GO (a node missing a file would play black there). A sync fixes it.
- Resilience: if the master drops, a node keeps playing its current content — its screen never goes black; when the master returns the node re-follows instantly (even onto a new cue).
TIMECODE — the show follows the clock ⭐
One switch turns VIIY from a manual desk into an automated playout: every cue has a Timecode mark, and while TIMECODE is on the show continuously follows the clock — like a tape locked to the soundtrack.
One source dropdown
- SETUP → TIMECODE → Source: TIMECODE OFF · SHOW CLOCK (internal) · LTC (external SMPTE) · MTC (MIDI Timecode). Picking a source makes it drive the cues immediately (the LTC/MTC reader starts by itself); the properties of the chosen source appear below the dropdown.
- SHOW CLOCK: Play / Reset + the clock. LTC: audio input dropdown + Start + a
LOCK / FREEWHEEL / NO TC status and the detected
@fps(24/25/30 auto, follows a source change, drop-frame accurate). MTC: MIDI port + Start + the same status (29.97 drop-frame accurate; joining a stream mid-way never shows a garbage timecode). - The header widget (visible on every tab) shows the clock, the source and TC ON/OFF — one click toggles it. Green time = running, amber = TIMECODE is on but the clock is standing (player paused / signal lost).
Follow semantics
- The cue with the latest mark ≤ clock plays at position
clock − mark. Crossing a mark fires the cue with its own transition (Cut / Crossfade / Wipe). - Pause the soundtrack → the show pauses. Seek it → the show seeks. Loop cues follow around the loop circle. Turning TIMECODE on late catches up instantly — right cue, right position.
- When a cue plays out, its On end rule works as usual (Still / Loop / Black / Next / →Cue) until the next mark takes over.
- TC owns the air: while the clock is running, manual GO / BACK / cue pads / PAUSE / TAKE / playhead drag are disabled (dimmed). Timeline editing stays free, and so does everything "live": MATRIX routing, master faders, layer/slice opacity, transforms, MIDI/DMX surfaces. STOP ALL (panic: also turns TC off) and BLACKOUT always work.
- SHOW READY flags two cues sharing the same mark as a critical error (an ambiguous target).
TIMECODE OUT — VIIY as the master clock ⭐ v0.9.64
Until now timecode was only an input: someone else led, VIIY followed. At a conference or in a theatre it is often the other way round — video leads, and sound and light follow it.
SETUP → ⏱ Timecode → TIMECODE OUT: SEND MTC, a MIDI output to send on, and the frame rate (24 / 25 / 30). The time comes from the SHOW CLOCK — the same clock already in the header, so there is no second, independent count of time to disagree with it.
- Quarter-frames go out four times per frame on their own thread, so a busy interface does not shake the timecode. VIIY re-syncs to the show clock once a second, and only if the two have drifted more than two frames apart — nudging on every small difference would be jitter we added ourselves.
- ⚠ Use a proper MIDI interface. Cheap adapters and MIDI-over-network add jitter that can make timecode unreadable at the far end — the same warning QLab gives about MTC.
MIDI Show Control — the lighting console calls our cues ⭐ v0.9.64
MSC is how a theatre drives every system from one desk. The console says GO cue 14 and VIIY fires the cue that owns number 14 — the number carried inside the message, not a key you had to map in advance.
SETUP → ⏱ Timecode → MIDI SHOW CONTROL: ACCEPT MSC and a Device ID (0–126). Messages addressed to Device ID 127 are a broadcast and are always accepted.
- Handled: GO (with a cue number, or without — meaning "the next cue"), STOP (which the specification means as pause), RESUME, ALL_OFF.
- ⚠ MSC cue numbers are text, not numbers. In the spec
1,01,1.0andQ2are four different cues. VIIY's numbers are whole, so anything fractional or lettered is not ours: VIIY ignores it and says so in the log rather than firing the nearest cue. Firing a cue the console did not ask for is not recoverable in front of an audience. - This is why cue numbers became the cue's own property in this version — see CUE LIST. A console addressing row positions would drift the moment anyone deleted a cue.
Virtual outputs & NDI OUT ⭐
VIRTUAL output
- In the OUTPUTS tree the monitor dropdown offers VIRTUAL — the output exists at its design resolution with no physical monitor: previews, mapper and the SHOW wall are fully live (rendered headless). Perfect for building a 4K+ venue setup on a laptop.
- The dropdown also has Design size W×H fields (formulas work), size presets and "Set design size = monitor resolution".
- Picking a physical monitor now sets the design size to that monitor's resolution ⭐ v0.9.51 — a new output starts VIRTUAL, and the moment you assign it a monitor it matches that screen; change it afterwards if you want something else. ⚠ Mind the one case where this bites: slice geometry is stored in absolute pixels and is not rescaled. If you plug a 1080p screen into an output you mapped for a 4K wall, the slices stay at their 4K coordinates — outside the output. Put the size back with the same "Set design size = monitor resolution" item or the Design size fields.
- A monitor already assigned to another output is greyed out and named
(
— busy (OUT 1)) ⭐ v0.9.51, even if that output's window is currently closed: an assignment reserves the screen, so two outputs can never collide on it. - If the assigned monitor is not connected, the output turns virtual automatically — the chip shows "Mon N ⚠"; a true virtual shows a purple VIRTUAL.
NDI OUT — an output into the network
- Every output row in the tree has an NDI chip (next to 👁 and ▦). ON = the output is broadcast as “VIIY · <name>” — the exact frame the monitor gets (slices, warp, mesh, colour correction, test cards), paced at the project FPS.
- Works for VIRTUAL outputs too — a screen that exists only on the network: monitoring on another PC, a stream feed, any NDI monitor or streaming app, or another VIIY.
- The state persists in the project and in .viiymap presets. Diagnostics: SETUP → Diagnostics log →
[ndiout N] frames/s.
ACTION screen — the crew display ⭐ v0.9.44
A whole output that shows the show, not the picture: what is on air, what is next, how long is left, and which cue events are coming. Hang it in the wings, at the follow-spot, at the pyro station — anywhere a department needs to know when rather than what. It is the same idea as a ProPresenter stage screen, driven by your cues and markers.
How to add: OUTPUTS → + ▾ → 📋 Add ACTION screen. It is a normal output: give it a monitor (or leave it VIRTUAL for NDI/monitoring). It reads no composition at all, so it costs almost nothing to run.
An ACTION output takes no SCREEN or POLY slices ⭐ v0.9.51: the crew page is drawn full screen and deliberately bypasses the mapper, so a slice added there would show nothing while still occupying the tree. The two menu items are greyed out on such an output and say why. The test card does work on it — that is exactly what you need when you are working out which monitor is which.
What it shows
- Header — show name · timecode with its source underneath (
LTC · TC ON,TC OFF) · wall clock. When timecode is off, the big number is dimmed, so nobody reads a stale value as live. - State — LIVE / PAUSED / BLACKOUT / STOPPED. A cue that has played to its end and waits for GO reads as HOLD, not PAUSED — the show is standing by on purpose, not because someone hit pause.
- NOW — the cue on air with a highlight plate, elapsed and remaining. When a cue overruns, remaining counts up and red instead of freezing at zero.
- NEXT — the following cue and its length.
- Where we are in the show —
CUE 7 / 19 · SHOW LEFT ~00:42:10. - ACTION — the events themselves: marker name, comment, countdown and an approach bar. Colours match the marker colours you set in the CUE EDITOR, so "red = pyro" reads the same on every screen.
Which events appear
Set per show in the ACTION tab (they are saved in the project):
- This cue only · This cue + next (default — a warning sitting on a cue boundary is visible before GO) · Preroll — an event appears exactly N seconds before itself.
- Keep events that already passed — a fired event lingers for one second, long enough to read "done", not long enough to steal a row from the next one.
- Unnamed markers are not events. A marker without a name is your own navigation aid; only named ones reach the crew.
Nothing is hidden silently. If more events exist than fit on the screen, the
section header says so: + 3 MORE — NOT SHOWN. An empty strip always means "there is
nothing more", never "we ran out of room".
ALL ACTIONS IN THE SHOW — the whole evening in one list ⭐ v0.9.51
The right-hand list of the ACTION tab is the only place where the evening is visible at once — on a timeline you only ever see one cue's markers. It is editable, and every edit lands on the marker itself:
- A marker and an ACTION are the same object, shown two ways. Right-clicking a row opens the marker's own menu — the same one the timeline gives you, not a copy of it. Edits are addressed by cue + timecode, so they go into that cue even if the show has moved on meanwhile, and the editor's buffer follows if that cue happens to be open.
- The menu: Edit ACTION… · Rename · Go to ACTION | Copy · Cut · Paste · Duplicate | Colour label ▸ | + Add ACTION… | Delete ACTION · Delete all in this cue. Paste lands in the cue you right-clicked, at the same timecode; if that frame is taken it steps one frame on rather than losing the paste quietly. + Add ACTION asks for the name first — an unnamed marker would never appear in this list.
- The timecode field is editable in place — type a new one and the marker moves on the timeline, the row sorting itself into its new position.
- Double-click a row to open its cue in the CUE EDITOR at exactly that moment.
Preview: UPRIGHT / AS ON SCREEN ⭐ v0.9.51. If the crew screen is a portrait monitor, its page is laid out for portrait — and the preview used to lie on its side, which made reading and editing miserable. The preview now stands upright by default; one click on ⟳ AS ON SCREEN shows the crew's real picture, rotation included, for the pre-show check. The caption under the preview changes with the state, so it never claims to be something it is not.
Import events from your editor ⭐ v0.9.45
The editor has usually placed those markers already. Retyping them by hand puts an error into the very thing the show is run by, so VIIY reads their exports as they are: ACTION tab → ⭳ LOAD….
- CSV / TSV — any table with a name column and a timecode column, in any order: the column
names are matched by synonyms (Marker Name · Name · In · Start · Record In · Timecode · Position).
XML / FCPXML —
<marker>elements, chapter markers included. EDL, and a plain text list of00:01:23 TITLElines. - Timecodes may be
HH:MM:SS:FF,HH:MM:SS,MM:SS, plain seconds, or the rational form12345/2400s. - You choose the target cue, a time offset (for exports that start at the sequence's own
01:00:00:00) and one colour for the batch. - A report is always shown — how many events landed, and every line that did not, with the reason: no name (not an event), beyond the cue length, or a time already taken.
Frames are converted with the PROJECT fps, and the report says so. If the export came from a sequence at another frame rate, the drift grows towards the end of the number — better to see it stated than to discover it on a cue.
Approach phases
Shared with the ACTION panel on the desk, so both read the same: calm beyond 10 s → the row warms to the marker colour under 10 s → red and blinking under 3 s. If the deck is paused the hot phase is suppressed — the countdown is frozen anyway, and a row blinking "2 seconds" while nothing can happen until GO is a lie the crew would learn to ignore.
Message to crew ⭐ v0.9.44
SHOW → the MSG button next to the ACTION panel. Type a line — HOLD, STANDBY and 5 MIN are one click — and it appears on every crew screen above everything else, amber. Clear it manually or let it expire. It is deliberately not saved into the project, and it is cleared when you open or create another project: opening tomorrow's show and seeing yesterday's "holding 5 min" would be worse than typing it again.
Look of the screen
- Text size 50–200 % — the monitor in the wings and the screen ten metres away need different sizes for the same event.
- Rotation 0/90/180/270 — a portrait monitor gets a page laid out for portrait, not a stretched landscape one.
- The ACTION tab shows a live preview of exactly this — size and rotation included.
The watchdog ⭐ v0.9.44
The crew screen is drawn by the output thread, which keeps running even if the interface does
not. If the page stops being updated for more than 5 seconds, the screen dims itself and shows a
red NO DATA — THIS SCREEN IS FROZEN band. A frozen page that still looks correct is
the most dangerous thing this display can do: the crew would keep trusting a countdown that stopped.
The watchdog stays quiet while the application is legitimately busy (loading a project), so
it warns about failure, not about work.
Mesh warp ⭐
Full mesh warping for projection mapping, per slice, on top of the 4-corner perspective warp — drag the corners and the mesh deformation survives.
- MAPPER → Mesh ON (auto-enables Warp mode) · Points H/V (2–17 per axis; changing the density resamples — the shape is kept) · Smooth (Catmull-Rom through the nodes) · Reset mesh.
- In the Output Map the slice shows blue nodes + the cage; drag a node = one undo step. Bézier handles: click a node (white) → amber horizontal and purple vertical diamonds appear; the first drag "freezes" that node's auto tangents.
- Cage on the physical output: while a slice is selected in Warp mode on the OUTPUTS tab, the projector itself shows the smooth grid + node crosses — you aim against the real surface.
- The canvas preview samples the actual output frame, so mesh / warp / CC are visible 1:1 in the editor. The mesh persists in .viiy and .viiymap; copying a slice carries it.
Camera calibration ⭐
Automatic projector alignment with any camera (webcam / NDI phone / DeckLink): VIIY projects structured-light patterns, the camera watches, and the result is a regular mesh you can still edit by hand: automatic first, precise by hand after.
- OUTPUTS → MAPPER → 📷 Calibrate: pick the camera → live preview → (optionally) drag a ROI around the projection in the camera frame → Hold ms (default 700; NDI cameras 1000+) · Mesh H/V · Scan photo toggle → Start.
- ~20–30 s of Gray-code patterns → a green contour of the found projection zone + coverage % → Apply: the mesh nodes are written to the slice, warp corners reset, Mesh/Warp switched on. Undo works.
- Scan photo = a photo "through the projector's eyes" laid under the canvas (the "Photo" toggle in MAPPER) — draw slices right on top of the real surface.
- Tips: lock the camera's exposure and focus; keep the light falling on the projection surface stable during the scan.
Slice presets + CROP a VIIY signature
- puts the layer into the slice's input rect: position = centre, scale = FILL without distortion (the file's real aspect);
- if the slice is narrower/taller than the video, the excess is trimmed automatically by CROP (symmetrically), so the layer matches the slice exactly;
- from there the layer is freely adjustable (position / scale / crop) — these are ordinary layer properties.
CROP (a section in CONTROLS)
- L / R / T / B in percent (0 = none). The header shows "· active"; ✕ reset clears it.
- Implemented in geometry (a shrunk quad + a texture window) — zero cost: 20 layers with no crop pay nothing, a cropped layer is still the same single draw.
- Rotation rotates the full frame (the crop travels with it). Crop works everywhere: preview, outputs, Bake.
Edge blending — joining projectors ⭐ v0.9.59
Two projectors aimed at one wall have to overlap, and in the overlap the light doubles. Edge blending fades each projector towards the overlap so the two add up to one even picture. Without it a wide panorama is simply not possible — the seam is a bright bar down the middle.
It lives on the slice (MAPPER → EDGE BLEND), not on the output: one output can carry several slices, and it is surfaces that get joined, not connectors.
1 · The zone
- Left / Right / Top / Bottom — the width of the fade, in percent of that side of the slice. 15% is the live-event standard; 10% is the practical minimum and 20% is safer on irregular surfaces or shaky rigging.
- Fill from overlap measures it for you: it looks at how far the neighbouring slices reach into this one in the composition — which is where projectors really overlap — and writes those numbers into the four fields. They stay editable: the button fills the boxes, it does not hide them. If nothing overlaps, it says so rather than quietly doing nothing.
- Guide draws a line in the slice's own colour exactly where the blend zone ends, so you can see the zone while you aim. It is drawn only while you are on the OUTPUTS tab — never on air.
- ◫ BLEND in the OUTPUTS toolbar (next to IDENTIFY and UG) shows every blend zone on all outputs at once, each in its own slice colour ⭐ v0.9.59 — which is how projectors are actually joined: looking at the whole wall, not at one slice. The number on the button is how many slices are blending, so an empty wall is an answer ("nobody has it on") rather than a puzzle. While it is on it overrides the per-slice Guide, and the slice button says so.
2 · The curve
- Power — the slope of the fade in the middle of the zone. Luminance — the value at the centre point; drop it if the join looks bright, raise it if it looks dark.
- Gamma R / G / B. This is not cosmetics. Two ramps that add up to 100% of signal do not add up to constant light, because a projector is not linear — that is what leaves a bright hump along the join. The gamma is what makes the two halves sum to exactly one in light, and it is per channel because no two lamps are the same colour. 2.2 is the usual projector value.
- Steps in the ramp are not the curve's fault ⭐ v0.9.63 — the curve is computed at full precision, and the only place it could lose that is the write to the screen. Since v0.9.63 VIIY writes outputs in 10 bits by default, which gives this ramp four times as many steps. If you still see banding here, check what the cable carries before touching Power or Gamma: the log names the depth of each output. See SETUP → Display → OUTPUT COLOUR DEPTH.
3 · Black level
- A projector cannot show black — it shows very dark grey. Where two of them overlap, the greys add up and the overlap band stays visible on dark content even when the blend is perfect on white.
- Black lift raises the black outside the zone to match the doubled black inside it, and Black curve shapes that transition. It trades a little contrast for an even wall — the same trade every professional blending system makes.
- Set it last, on dark content, with the lights off in the room.
Effects — details ⭐
The full effect list, the generative FX (Particles / Lightning / Lattice / Sky / Ocean), Color LUT and ISF are described in EFFECTS above. This section covers the older notes on Fire and effect handling.
The Effects library (right panel in CUE EDITOR) is a searchable list — double-click or drag an effect onto a timeline layer. Every effect parameter is animatable with keyframes, and can be driven by a MIDI fader (see below). Since the show content usually arrives already finished from your editing and compositing software, the built-in effects focus on colour correction and a few looks rather than a big library.
Fire
- A procedural GPU fire tied to a chosen colour key: pixels of that colour in the video become the "source" from which flames rise. Parameters: Source colour · Tolerance · Height · Intensity · Speed.
- It runs in both engines (preview and output), loops, and animates on its own.
Slice-level COLOR CORRECTION (Gamma / Gain / Lift / Temp / Tint) lives in the OUTPUTS MAPPER and applies at the output stage, per slice.
Lip-sync — the sound is early, not the picture late ⭐ v0.9.64
On site the sound almost always arrives before the picture. Nothing is broken: an LED processor, a scaler or a projector needs 2–5 frames to push a frame through, and audio has no such delay. The cure is to hold the audio back by the same amount.
SETUP → 🔊 Audio → LIP-SYNC — 0–500 ms, with the equivalent in frames shown next to it for your project's fps.
- How to set it, once, on site: play something with a visible hit — a clap, a drum, a slate — stand where the audience will be, and raise the value until sound and picture land together. Do it from the room, not from the desk: the desk is metres closer to the speakers.
- The setting belongs to the machine, not to the show. The same show on another rig, with a different processor, needs a different number — so it is not saved into the .viiy file.
- Zero means the audio goes out as soon as it is mixed, exactly as before — costing nothing.
The delay is applied last, after the meters and after the audio analyser. That is deliberate: it exists to line the sound up with the picture in the room, so audio-reactive effects keep following the sound as it is mixed, not as it is heard. Otherwise fixing a presenter's lips would quietly put every audio-driven effect out of step with the beat.
MIDI mapping ⭐
A universal MIDI learn that works with any MIDI surface — several at once. There are no per-surface profiles: you map by learning. Tested with an AKAI APC mini.
What can be mapped ⭐ v0.9.34 — anything highlighted in MIDI MAP mode: transport (GO / BACK / PAUSE / TAKE / STOP ALL / BLACKOUT), cues, tabs, masters, screen opacity and colour correction, MATRIX arm/route/preset, and on the selected layer its position, scale, rotation, anchor, opacity, volume, Visible / Solo / Audio-mute, plus any parameter of any effect and each effect's on/off — so a fader can drive, say, the turbulence of a particle emitter or the wave height of the ocean. CUE EDITOR play/pause too.
SETUP → Control input lists every assignment ⭐ v0.9.34 as “control ← surface key” with a ✕ to remove one, so the map is reviewable instead of all-or-nothing.
Two ways to map
- SETUP → MIDI CONTROL → LEARN next to an action, then press a pad / key / fader on the surface — bound. ✕ removes a binding. The "Input:" indicator shows the last MIDI event.
- MIDI MAP mode (the button in the header, or Ctrl+M): mappable controls light up across the whole UI — blue = free, green = bound, amber = waiting for MIDI. Click a control, press on the surface — linked. In map mode the normal actions are disabled so a click maps instead of firing.
What can be mapped
- Transport & show: GO / BACK / PAUSE / STOP ALL / BLACKOUT / TAKE, and the GO of each cue in the CUE LIST (the transport actions respect the TIMECODE lock).
- Masters: MASTER VIDEO / AUDIO (CC faders, 0–127 → 0–1).
- Tabs (all six).
- MATRIX: arm a source, route source→slice, recall a preset; slice opacity — all of it stays live even under the TIMECODE lock (switch a camera mid-song from a pad).
- Layer opacity of the selected layer, layer select (pads on timeline rows), layer transform (Position / Scale / Rotation / Anchor), layer → screen, and any parameter of any effect — with animation ON the knob writes keyframes at the playhead, exactly like the mouse.
LED feedback
VIIY opens every MIDI output (skipping the Microsoft GS synth so it never plays sound) and drives the pad LEDs: a bound pad is green, the live cue blinks green, the active tab / armed source / routed slice blink amber, STOP ALL and BLACKOUT are red (the active one blinks). A clean shutdown turns the surface off.
AJA cards ⭐ v0.9.61
AJA KONA, Io and T-TAP cards work alongside Blackmagic DeckLink, in both directions. The AJA driver (Desktop Software) is not part of the VIIY installer — install it first, exactly as you would Desktop Video for Blackmagic.
- Output: OUTPUTS → Device menu →
◆ <card> (AJA). The output then behaves like any other: mapper, slices, test card, 👁 on/off. - Input: the card appears in LIVE INPUTS as
<card> [AJA]and can be put on a layer or a MATRIX tile like any camera. The format is read from the card, so switching a camera from 1080i50 to 1080p50 mid-rehearsal is picked up as a change of size. - No signal turns the layer into MEDIA OFFLINE rather than freezing on the last frame — a frozen picture is indistinguishable from static content, and you would hear about the dead cable from the audience rather than from the screen.
- A size with no standard mode is refused, with the reason. A portrait 1080×1920 wall or 2560×1600 has no standard SDI mode; VIIY says so in SHOW READY instead of quietly sending 1920×1080 down the cable.
- Colour is computed by the same code as the DeckLink path, so two SDI outputs from different vendors in one show cannot drift apart.
OSC — and a Stream Deck
OSC is how the rest of the show talks to VIIY over the network: a QLab network cue, a lighting desk, a tablet, or a Stream Deck through Bitfocus Companion. It travels over UDP, and both directions live in SETUP → Control input.
OSC IN — commands to VIIY
Set the UDP port (default 53000) and press Start. The addresses are:
| Address | Argument | What it does |
|---|---|---|
/viiy/go | — | GO — the next cue on air |
/viiy/back | — | the previous cue |
/viiy/gocue | N | fires the cue that OWNS number N ⭐ v0.9.64 — the number you see in the CUE LIST, not the N-th row. Deleting a cue above it does not move the target. An unknown number does nothing and says so in the log. |
/viiy/take | — | TAKE the editor to PROGRAM |
/viiy/pause | — | pause / resume what is on air |
/viiy/stop | — | STOP ALL |
/viiy/blackout | 0 / 1 (or none = toggle) | blackout |
/viiy/master | 0.0–1.0 | master video level |
/viiy/status | — | asks VIIY to send its whole state back. Changes nothing ⭐ v0.9.61 |
OSC OUT — VIIY tells the controller what the show is doing ⭐ v0.9.61
Give it a host and port and press Start. From then on, whenever something changes, VIIY sends it out — on the same addresses you would use to set it, so there is one dictionary to learn, not two.
| Address | Value |
|---|---|
/viiy/cue | integer — the cue on air, counting from 1. 0 means nothing is on air |
/viiy/cue/name | string — the name of that cue |
/viiy/playing | integer 0 / 1 |
/viiy/blackout | integer 0 / 1 |
/viiy/master | float 0.0–1.0 |
- Only changes go out. A controller that receives the same value 25 times a second cannot tell a real change from a heartbeat, and it would be the thing that turns a mis-typed address into a flood.
- Switching it on sends everything once, and so does
/viiy/status— otherwise a controller powered up mid-show would sit blank until the next GO. - The destination cannot be VIIY's own listening port. That is refused with a line on screen, and not out of tidiness: every value VIIY sent would come straight back as a command.
Stream Deck, in practice
A Stream Deck talks to VIIY through Bitfocus Companion (free), using its Generic OSC connection — the same route Companion uses for lighting desks and other media servers. Nothing extra is installed on the VIIY machine.
- In Companion, add the connection Generic → OSC. Point its target at the VIIY machine and the port from OSC IN (53000 by default).
- Give the connection a listen port of its own — for example 53001 — and put that same host and port into VIIY's OSC OUT. The two must not be the same number as OSC IN.
- Buttons: add the action Send message without arguments with path
/viiy/go, or Send integer with/viiy/gocueand the cue number. Same for/viiy/blackout(integer 0 or 1) and/viiy/master(float). - Lights on the buttons: add the feedback Listen for OSC messages (Integer) on
/viiy/cueand compare it with that button's cue number — the button now lights when that cue is on air, even if the operator pressed GO on the keyboard. The same works for/viiy/playingand/viiy/blackout.
/viiy/cue for the lights, and treat
/viiy/cue/name as something for a logger, a tablet or your own tooling — not as a reliable
label on a key.DMX IN (Art-Net / sACN) ⭐
A lighting desk can drive VIIY through the same mapping system as MIDI — no separate profiles.
- SETUP → DMX IN: Art-Net (UDP :6454, coexists with other software) and sACN (:5568, multicast U1–16 + unicast any universe) toggles, default OFF; a pkt/s + universes status shows the desk is seen.
- Learn exactly like MIDI: enable DMX → MIDI MAP mode → click a control → move a fader on the desk → bound (the key is protocol + universe + channel). Faders use the full 0–255 range; buttons trigger at ≥50%.
- Everything mappable by MIDI is mappable by DMX, including layer select (pads on the timeline rows), layer transform (Position / Scale / Rotation / Anchor sliders), layer → screen buttons and opacities.
Pixelmapping — video to fixtures ⭐ v0.9.58
The other side of DMX IN: there a lighting desk drives VIIY, here VIIY drives the lights. A small canvas is built from the fixtures you actually have, the composition is cropped onto it, and every cell takes the colour of the pixel it sits on.
The canvas is small on purpose. A pixelmap is not 1920×1080 — it is exactly as large as your layout (say 32×8), so you build content for it instead of squeezing a clip into a corner of a screen. VIIY derives that size from the layout and keeps it in step: add fixtures and the output grows by itself. You never type it.
1 · Fixture profiles — what a fixture is
- SETUP → Pixelmapping → FIXTURE PROFILES. A profile is the type: cell grid, channel order (RGB, BGR, GRB… RGBW, single-channel dimmer), 8 or 16 bit, and gamma.
- Starter library fills the common types in one click; + New profile adds your own. Nothing is ever overwritten.
- Gamma sits in the profile because LEDs are not linear — this is the response curve. It never moves the ends of the curve (black stays black, full stays full); the number itself is dialled in on site against the real fixtures.
- Sampling filter ⭐ v0.9.59 — how a cell takes its colour from the
picture. None: the single pixel under the centre of the cell. Box: the average of the
cell's own area. Anamorphic: the average of an area with separate width and height — the one
for LED strips and non-square pixels. The size is in cells, so 1.00 is exactly the cell's own
footprint and 2.00 reaches into the neighbours and reads softer.
Why it matters: without averaging, a low-resolution wall flickers on movement — each cell grabs one arbitrary pixel out of a large piece of the picture, and the next frame grabs a different arbitrary one. - LED tape is a special case, and it is handled: for a freeform profile the number of elements belongs to the fixture, not to the type — so one profile covers a 60-pixel run and a 12-pixel run. ⭐ v0.9.59 + One fixture on a freeform profile starts the run with a single element; type its real length in the CELLS column. The grid generator does not take freeform profiles, and says so — a run has no fixed size to tile.
2 · Where they stand
- GENERATE A GRID lays out a whole wall in one dialog: count, start position, spacing, turn, start corner, horizontal or vertical order, Snake (every other row addressed backwards, the way LED strings are really wired) and Turn snake rows for rows that hang upside down.
- Addresses are handed out for you, and a fixture never straddles a universe: if it does not fit in what is left, it moves to the next one whole — the same rule a lighting desk follows.
- FIXTURES IN THE SHOW lists what you have; universe, start channel, position and turn are editable in place. Overlapping addresses are refused by name: “fixtures 3 and 7 share channel 12 of universe 0”, not “something went wrong”.
- SAMPLING ×N ⭐ v0.9.59 is what makes the filter mean anything. The canvas stays exactly your layout — that never changes — but the frame behind it is rendered N times denser, so one cell covers an N×N block instead of a single pixel. At ×1 there is nothing to average and every filter behaves like None; ×4 is a good default and costs almost nothing on a canvas this small. The slices you drew in the MAPPER are untouched by it.
- UNIVERSE CEILING is how many universes this show is allowed to use — up to 64 ⭐ v0.9.60 (it was 10 through v0.9.59), and it is saved with the show. It cannot be lowered below a universe that is already occupied: the answer names the fixture in the way, because a silently darkened fixture is not something you want to discover on site.
- The patch — profiles and all — is saved inside the show, so it travels with the project file.
3 · The picture: a PIXELMAPPING output
- OUTPUTS → device dropdown → ⇢ PIXELMAPPING, next to monitor / NDI / Spout / SDI / VIRTUAL. Its size is the layout size and follows it; the menu entry tells you what it will be.
- Crop, rotate and mask it in the MAPPER exactly like any other output.
- Several pixelmap outputs at once ⭐ v0.9.60 — two walls fed from two
different outputs. Each fixture says which output feeds it: the OUT column in FIXTURES IN THE SHOW.
Each output then has its own layout and its own size — they are separate walls, not one stretched picture.
⚠ A universe belongs to exactly one output. Every output sends the full 512 channels of the universes it drives, so two outputs sharing a universe would overwrite each other every frame and the fixtures would flicker between two pictures. VIIY refuses that by name — telling you which universe, which output already has it, and which fixture is trying to take it. (Until v0.9.59 the whole second output was refused instead; now only the actual conflict is.) - SHOW READY tells the truth about the whole chain ⭐ v0.9.59: no fixtures, transmission switched off, no destination address, or another output owning the universes — each is said out loud. A layout on its own is not light yet.
4 · Sending it
- SETUP → Pixelmapping → TRANSMISSION → Send Art-Net. Off by default, and that is deliberate: creating an output must never start flooding somebody else's lighting network.
- Destination:
255.255.255.255broadcasts (the usual Art-Net way), or type a single address for unicast. ⚠ Sending to this machine's own address will not be seen by other software on the same PC — use broadcast for that. - The status line shows packets per second; if the machine cannot keep up, dropped frames are counted in plain sight rather than queued up and dumped on the fixtures later.
- Stopping blacks the fixtures out ⭐ v0.9.60. This is deliberate and worth knowing: a DMX receiver holds the last frame it was given, so "stop sending" on its own would leave the wall lit on whatever video frame happened to be last. VIIY writes one zero frame to every universe it was driving, then closes the socket.
- The settings travel with the show ⭐ v0.9.61: protocol, destination,
priority, synchronisation and output delay are saved in the
.viiyfile alongside the patch. Until v0.9.61 they lived only until you closed the program — you set up sACN with synchronisation, came back the next day, and the same patch quietly went out as unsynchronised Art-Net broadcast. Whether it is sending is not saved, and that is on purpose: transmission stays something a person switches on, so opening a show can never start driving a venue's lighting network by itself.
5 · Output nodes — which controller gets which universes ⭐ v0.9.60
One destination for everything is fine on a desk and wrong on a site: real controllers sit at different addresses. A node is one controller on the wire — a name you will recognise on site, its address, and the contiguous block of universes it takes.
- SETUP → Pixelmapping → OUTPUT NODES → + Node. Universes that no node covers keep going to the default destination above.
- Two nodes may not claim the same universe — the frame would reach only one of them, so this is refused by name rather than warned about.
- The row shows how many fixtures actually sit in that block. A node reading
⚠ 0 fixturesalmost always means the universe range is wrong, and it is much cheaper to see that here than on site. - A node can be switched off (●/○) without deleting it — its universes fall back to the default address.
- Nodes are saved with the show: bring the same show to another venue and you change the addresses, not the layout.
Finding the controllers instead of typing their addresses ⭐ v0.9.60
⌕ Discover asks the network who is out there and lists everyone who answers — address, name, number of ports. → output node turns any of them into a node row without you retyping an address (and therefore without mistyping one).
- It needs DMX IN (Art-Net) switched on in Control input — the answers arrive on that same socket. VIIY says so on screen when it is off.
- VIIY asks only when you press it, not continuously. A media server that keeps broadcasting polls into a house lighting network for the sake of a settings screen is not a good guest.
- Nodes that never answer are simply not shown. That is worth knowing on site: if a controller is missing from the list, it is either on another subnet or not on the network at all — the list is evidence, not a guarantee.
6 · ArtSync — one frame across all universes ⭐ v0.9.60
Without it, each universe is output by the receiver the moment it arrives. On one or two universes you will never notice; on a wide wall spread over dozens, the top shows a newer frame than the bottom — this is tearing. ArtSync makes VIIY broadcast one small packet after the whole frame has been sent, and every receiver puts its universes out at that instant.
- Off by default, and switched on by you. The receiver has to support ArtSync, and not all of them do it well. If a controller starts behaving strangely, this is the first thing to turn off.
- Once a receiver has seen a sync packet it waits for the next one, so VIIY sends it with every single frame. Stopping the transmission also sends a final sync, otherwise the blackout would sit in the receiver's buffer for four seconds.
7 · Import a patch instead of typing it twice ⭐ v0.9.60
Your rig already exists somewhere: in the lighting desk, in the visualiser, in the drawing. MVR (DIN SPEC 15801) is the industry file that carries it — fixtures, their DMX addresses and where they hang. grandMA3, Vectorworks, Capture, ChamSys and others write it. VIIY reads it, so the same rig is not typed in twice.
- SETUP → Pixelmapping → IMPORT → ⤓ Open MVR… Nothing is placed yet: VIIY first tells you what is inside — how many fixtures, of how many types, who wrote the file.
- You map the types. Each foreign fixture type gets a row, and you choose which of our
profiles it becomes. Types left on
— do not import —are simply not placed. This one decision is yours on purpose: only you know whether a foreign "LED bar" is your 16-pixel profile or your 8×8 tile, and guessing it would quietly patch a wall on the wrong channels. - Addresses come from the file as they are — universe and start channel, exactly as the desk has them. (MVR counts universes from 1 and Art-Net from 0; VIIY converts, so what you see matches the desk.)
- Positions come from the file too. Front takes width and height — the usual case, a wall.
Top takes width and depth — a floor, a ceiling, a truss.
mm per cellat 0 fits the whole rig into 64 cells; set a real number if you want true scale. - Replace throws away the fixtures already in the show; off means add to them.
- Afterwards VIIY reports both numbers — placed and total — plus every fixture it refused, by name. "Imported 24 of 76" with the reasons is honest; a bare "done" would not be.
An MVR usually carries the fixture types too, as GDTF files inside it. VIIY reads them for one practical reason: how many channels each type occupies. The row for each type shows it, and with that VIIY can answer a question the MVR alone cannot — does this patch actually fit? The file only stores each fixture's starting address, so two fixtures set too close together run into each other and nothing in the desk says so. If that happens, VIIY lists the clashes before anything is imported.
8 · sACN instead of Art-Net ⭐ v0.9.60
The button next to Send switches the protocol. Art-Net sends to the address you type. sACN (ANSI E1.31) is multicast: every universe has its own group, and a switch with IGMP carries a frame only to the ports that asked for it. That is exactly what you want once the patch grows — with Art-Net you eventually have to abandon broadcast and hand out addresses by hand; with sACN the addressing does it for you.
- Universes shift by one, and VIIY says so on screen. Art-Net counts universes from 0, E1.31 from 1 — there is no universe 0 in sACN. So patch universe 0 leaves as sACN universe 1. Keep that in mind when comparing numbers with a desk.
- Priority (0–200, normally 100): if two sources send the same universe, the receiver listens to the higher one. It is the standard E1.31 mechanism, so it is on screen rather than hidden.
- Stopping blacks out exactly as with Art-Net, and so does switching protocol mid-show: whatever was lit by the old protocol is put out rather than left frozen.
- Universe synchronisation ⭐ v0.9.61 — see below.
Universe synchronisation in sACN ⭐ v0.9.61
In sACN mode the ArtSync button is replaced by a sync universe box, and that is not a cosmetic difference. ArtSync is one broadcast to the whole network; E1.31 synchronisation has an address — a universe number that travels inside every data frame. A receiver holds the frames that carry that address until the synchronisation packet arrives on it, and then the whole wall changes at once.
- 0 means off, and that is the standard's own zero, not ours: a data frame carrying address 0 says "this is not synchronised, act on it now". So there is no separate on/off switch to disagree with the number.
- Any number from 1 to 63999. Pick a universe the show can spare; VIIY sends the packet to that universe's own multicast group and shows you the group next to the box. A universe may carry both data and synchronisation — the standard allows it — but a number nobody else uses is easier to read on a monitor.
- If VIIY stops or the network hiccups, the wall does not freeze. Each frame is marked so that a receiver which loses the synchronisation stream reverts to showing frames as they arrive (2.5 s in the standard). The alternative — the other legal choice — is a wall that stands still until synchronisation comes back, and for a video server that is the worse of the two.
- Stopping still blacks out immediately. The blackout frame is sent with sync address 0, so a receiver acts on it at once instead of holding the darkness back waiting for a packet that will never come.
- The receiver has to support synchronisation. If a controller behaves oddly, set the box to 0 first — the same first move as turning ArtSync off on the Art-Net side.
- Stopping also says goodbye properly ⭐ v0.9.61: after the blackout VIIY sends three stream terminated packets per universe, which is what the standard asks a source to do when it stops. A receiver then knows VIIY left on purpose instead of waiting out a timeout and treating it as a fault. The blackout goes first on purpose — a receiver ignores the levels inside a terminated packet, so putting the two together would send a blackout that blacks nothing out.
VIIY announces its universes ⭐ v0.9.61
While sACN transmission is on, VIIY sends a universe discovery packet every 10 seconds (and one the moment you press Send), listing the universes it is driving plus its synchronisation address. This is what the standard asks of a source, and it is how monitoring tools show who is on the network without subscribing to every multicast group and sniffing all of the lighting traffic. It stops the moment the transmission stops — VIIY never announces universes it is not driving.
⚠ This is a different question from Art-Net discovery, where VIIY still stays silent until an OEM code is assigned to it. Nothing is registered or borrowed here: the packet carries VIIY's own source name and its own identifier.
9 · Output delay — when the light runs ahead of the screen ⭐ v0.9.60
LED reacts the instant the data arrives; a projector does not — it has a pipeline of its own. Feed both from the same frame and the light is visibly early. The delay box next to ArtSync holds the light back by that many milliseconds so the two land together.
- It starts at 0 on purpose. Other software ships a default of around 40 ms, but that number belongs to their pipeline, not yours. Put the wall and the screen side by side, play something with a hard cut, and dial the delay until the two agree.
- Up to 1000 ms. Past a second you are no longer aligning anything.
- Stopping the transmission still blacks out immediately: a frame that was waiting out its delay is thrown away rather than landing after the blackout and lighting the wall again.
Deinterlace
Interlacing is treated at the source, not as an effect (a proper deinterlacer beats a shader — it is a property of the footage).
Files (bake it into HAP)
- In the bin a file that looks interlaced is tagged "· interlaced" (the probe now decodes a frame when the container has no field-order tag, so untagged interlaced material is detected too).
- Convert to HAP offers a deinterlace choice: Off · Auto · Top field (TFF/Upper) · Bottom field (BFF). The HAP is tagged progressive so it does not inherit a wrong field order.
Live SDI (DeckLink)
Runtime deinterlace on the capture thread. Detection is by field dominance in the input-format-changed event. Right-click the DeckLink card in MATRIX to choose the mode: Auto (blend if interlaced) · None · Blend (a soft vertical low-pass, 0 added frames) · Bob (line-doubles the dominant field — respects TFF vs BFF, so lower-first SD such as 576i no longer jitters). The card shows an "interlaced" / "DEINT BLEND" badge; the mode is remembered per input. NDI / Spout / webcams are progressive and have no menu.
BAKE — render a cue to file ⭐
Renders a heavy cue (layers + keyframes + effects + fades) into one video file — on the show it plays as a simple clip. Trigger: right-click a cue → 🔥 Bake to file… (or CUE ▾ for the current editor).
- Format is asked each time: Hap Q (recommended) / Hap / Hap Alpha.
- AUDIO ON/OFF: ON bakes an offline mix of all the cue's audio tracks (volumes, volume keys, fades) into the file. Picture and sound always come out the same length ⭐ v0.9.48 — the mix is measured in frames, not seconds, so a cue whose duration does not divide evenly into frames (0.5 s at 25 fps is 12.5) no longer loses its last frame to the shorter of the two.
- Progress + Cancel (cancelling removes the unfinished file).
- Result ⭐ v0.9.49 — you choose where the baked file lands, before the
render starts. The file always goes to project/media/ and into the bin; the
choice is only about the cue:
- New cue (default) — a new cue "Name (baked)" next to the original. Nothing else changes.
- Replace layers — the cue's layers are replaced by the single baked file. The timeline becomes one clip: light to play, nothing left to tweak.
- Keep + mute — the layers stay but are switched off, picture and sound both, and the baked file goes on top. Use it when you may still want the originals back.
- ⚠ Baking flattens the cue: which layer goes to which screen is decided at bake time and for good. What the screens show does not change — the slices still cut the canvas — but you can no longer move one screen's content on its own.
- The render runs on a separate D3D engine in the background — the program keeps playing during a bake. Speed is whatever the hardware manages (not realtime). The picture is 1:1 with the program (shared compositing core).
SHOW READY — preflight ⭐ v0.9.37
The SHOW READY button in the SHOW transport (called ✓ VERIFY before
v0.9.37). One button instead of a dozen "did I really do everything?" — and it keeps the last
result in its colour: grey SHOW READY? not checked yet · green ✓ clean ·
amber ⚠ warnings · red ✖ critical. Hover for the time and the summary.
| Check | Result |
|---|---|
| Project saved to disk | ✖ never saved · ⚠ unsaved changes, naming what exactly |
| Every media file of every cue exists | ✖ red "FILE MISSING" + where it is used, and a 🔗 Relink N missing… button straight to Relink missing media ⭐ v0.9.38 |
| File codec | ⚠ amber "heavy codec — convert to HAP" |
| File FPS = project FPS | ⚠ a warning on mismatch |
| Live inputs (cameras) | ⚠ "check the signal manually" |
| Media collected into the project folder | ⚠ N files live outside it → Collect Files |
| Outputs: monitor connected? open? Hz a multiple of FPS? | ✖ / ⚠ / ✔ |
| Cues sharing one timecode mark | ✖ ambiguous CHASE target |
| Main / Backup: split-brain, master visible | ✖ / ✔ (asked only when multi-server is on) |
| Sync PIN set | ⚠ empty PIN → pair before the show |
| External timecode: input on? signal locked? | ✖ off while chasing · ⚠ no lock yet · ✔ locked |
| Audio output device | ⚠ not ready → check SETUP |
| VRAM headroom | ⚠ over 80% · ✖ over 95% (textures spill to system RAM) |
A summary at the top: "ALL GREEN — show ready" or a list of problems. Re-check repeats it.
Bottom row: ▶ ENTER SHOW MODE — verify and lock the desk in one move. It is deliberately not blocked by findings: a show sometimes starts with a known problem, and that call belongs to the operator.
Relink missing media ⭐ v0.9.38
The project moved to another machine, the drive letter changed, someone reorganised the footage folder — every cue now points at files that are not there. SETUP → Project → 🔗 Relink missing media… (or the 🔗 Relink N missing… button in the SHOW READY checklist) opens one dialog that fixes the whole project.
- 📁 Choose folder… — point VIIY at the folder that now holds the footage. ◉ Subfolders searches it recursively; ⟳ Rescan repeats the search after you move something.
- The table lists every missing file, where it is used ("in bin only", or the cues), and what was found for it: → matched · ⚠ possible · ✖ not found in this folder. Untick a row to leave it alone.
- 🔗 Relink selected — the bin, the editor and every cue are re-pointed in a single pass.
- Nothing is written to disk until you save — the relink lives in the project in memory, so a bad guess costs you nothing. The dialog offers 💾 Save project and ↻ Re-check show once it is done, because those are the next two steps anyway.
- Several copies with the same name — the row carries a 1/3 ⟳ button: click it to cycle through the candidates (path and size are shown) until the right one is in the row.
- Two genuinely different files with the same name are not relinked silently ⭐ v0.9.39: the row is marked possible ("name matches, could not confirm it is the same file") and waits for the operator to confirm or cycle to another candidate. A wrong file that matches by name is worse than a missing one — it plays.
User Guides & test card ⭐
UG (the button in the SCREENS header)
ON: the physical screens show a grid (if Grid is on, at the same step), the frames of all slices (in the slice colour, with warp/mirror applied) and the white frame + veil of the selected one — click slices in the tree and the selection "runs" across the wall. OFF: clean video.
Test card (▦)
- On a screen — a card across the whole monitor; on a slice — a personal card inside the slice box (warp/mirror apply — handy for aligning geometry).
- A proportional design (a circle stays a circle, cells stay square, taken from the shorter side) with
the name + W×H. The header reads
OUT 1 · Mon 2(for a slice, also its name). - The centre carries the V:I:I:Y emblem in a circle and the "V : I : I : Y · MEDIA SERVER" wordmark; bars / grid / cross / corner markers are the classic set.
Your own test card ⭐ v0.9.39
Right-click the ▦ icon of an output or of a slice: Load test image… (PNG / JPG / BMP / WEBP) replaces the built-in card with your picture — a venue pattern from the contractor, a client's build-check slide. Use built-in card goes back, Reveal image in Explorer opens the file.
- The image is fitted keeping its aspect ratio; on a slice it goes through the slice's warp / mesh / mask like the built-in card does. An unreadable file falls back to the built-in card — the output never goes black.
- The path is stored in the project and in the .viiymap preset, so it travels with the show.
- A green dot on the ▦ icon means that target is using a custom image rather than the built-in card.
HAP conversion
Right-click files in the bin → Convert to HAP ▸: Hap (DXT1, smallest) ·
Hap Alpha (DXT5, with transparency) · Hap Q (YCoCg, best colour — the project standard),
with an optional deinterlace choice and a "Save to" row
⭐ (the project's media/ · next to the original ·
a custom folder — remembered). Progress and ETA appear right in the file row;
the converted copy *_hapq.mov is treated as "the same footage"
on Replace. HAP unpacks on the GPU — CPU load ≈ 0.
After a conversion VIIY offers to replace the original with the HAP everywhere it is used (layers / cues / MATRIX) — "Replace everywhere" or "Keep original". Batch conversions queue their prompts.
SHOW MODE ⭐ v0.9.37
The SHOW MODE button (called LOCK before v0.9.37) sits in the right-hand side of the header, next to the TIMECODE chip ⭐ v0.9.39 — it used to stand beside the logo, right against the SHOW tab, and the two similar words were easy to hit wrong. It, or Shift+Space, locks editing for a performance. It blocks everything except the transport and the cue GOs: tab switching, MIDI-MAP, branding, cue editing, reordering, right-click menus, +New and the editing shortcuts are all gated while locked. Ctrl+S keeps working — saving is never a risk. Rehearsal is an editor; a show is a desk.
press again. Locking stays instant: erring towards safety
costs nothing, while one stray click used to throw the catch open mid-show.Output destinations
An open SCREEN goes wherever its Device menu points (see OUTPUTS) — only the monitor destination is a window; the rest render headless.
Monitor output windows
- A SCREEN on a monitor = a native borderless full-screen window on it (its own swapchain past DWM — an independent, even present).
- Esc or a double-click in the window closes the output (also 👁 in the tree, or F12).
- The badge top-left:
SCREEN N · NN fps— the content fps (new frames/s; green = it holds the project FPS). It can be turned off in SETUP. - After sleep/TDR the output reopens automatically. If the receiver stops taking frames or the cable is pulled, the output falls back to VIRTUAL and offers a ⚡ chip to return — see Auto-VIRTUAL ⭐ v0.9.39.
Non-window outputs: SDI · NDI · Spout · Virtual
- SDI — frames go straight to the selected capture/playout-card connector; nothing appears on the desktop. Close/open with the same 👁 / F12.
- NDI — the output is broadcast into the network as an NDI sender (NDI OUT); receivers see it by the screen's name.
- Spout — the output is shared as a GPU texture to other applications on the same machine.
- VIRTUAL — a design-size canvas with no physical destination at all: map and preview a wall you don't have on site yet (Virtual outputs); pair with NDI to monitor it elsewhere.
- All destinations render the same engine output — slices, warp, mask, colour correction and routes are pixel-identical whether the frame lands on a monitor, a cable or the network; the SHOW OUTPUT PREVIEW shows exactly that frame.
Project files
| Path | What it is |
|---|---|
| <folder>/<Name>.viiy | project (JSON): cues, layers, displays/slices, media list, salvos, MATRIX pool |
| <folder>/media/ | collected media (Collect, Bake results) |
| <folder>/PRESETS/My transform presets/ | user transform presets (*.json) |
| *.viiymap | OUTPUTS layout preset (outputs + slices, incl. mesh & NDI flags) |
| <folder>/ai/ | materials attached to the AI Showbuilder (PDF / images / txt) |
| <folder>/scan-outN.png | calibration scan photo (the canvas "Photo" underlay) |
| %APPDATA%/…/viiy.config | recent projects, workspace, MIDI map (global, one surface for all shows) |
| build/LOG/viiy.log | runtime log (all QML errors + diagnostic probes) |
Licence & demo mode ⭐ v0.9.41
VIIY runs in one of two states, and the difference is one thing only: without a licence every output carries a V:I:I:Y watermark. Nothing else is limited — every feature, every output, every tab works exactly the same. The watermark appears on the monitor window, on SDI, NDI and Spout, and in the previews alike, because it is drawn into the frame before the output is published. Its position changes every twenty seconds, and it is random ⭐ v0.9.75 — a different spot on each output, always fully inside the frame. Until v0.9.75 it cycled through five fixed spots, which a camera could simply be framed around.
Everything about the licence lives in SETUP → License: the current state, how long it runs, the Machine ID, the key field, and the button that takes the licence off this computer.
Activating
- With a key — paste the key you were given and press Activate. Needs the internet once; after that VIIY works offline until the licence expires.
- With an offline token — for venues with no line out at all. Send us the Machine ID shown on the page (the Copy button next to it), get a signed token back, paste it into the same field. No network is involved at any point: the signature is verified on the machine.
One licence, several machines
A licence holds a number of seats. The first machine to activate takes the Professional seat (the main server); every next one takes a Companion seat — the backup and the render nodes. Extra nodes are sold as extra seats on the same key, not as a different product, and SETUP → License shows which seat this machine holds and how many of them are in use.
A Companion seat is not a cut-down version — the software is identical. The limit lives in the licence terms, not in the program: one licence covers one show running at a time. A separate, parallel show on independent machines needs its own licence.
Moving a licence to another computer
Machines die, and they die the night before a show. SETUP → License → Deactivate this machine frees the seat, and the same key then activates the replacement. The button asks twice on purpose: the outputs start carrying the watermark the moment it goes through.
What will never happen mid-show
The licence state is decided once, at launch, and inside a running session it can only get better, never worse. A revoked key, a freed seat, an expiry that falls during the show — none of them can put a watermark on outputs that are already live. They apply at the next launch.
Before the licence runs out
SETUP → License shows both the number of days and the exact date (until 24 Aug 2026) — shows are planned on a calendar, not by counting days in your head. Under seven days left the line turns amber. If it does run out, VIIY keeps working and the outputs go back to demo at the next launch.
Installation & deploy ⭐
- Installer: dist\VIIY-<version>-setup.exe — installs to Program Files, creates shortcuts (Start Menu + optional desktop), silently installs the VC++ runtime.
- Licensing files ⭐ v0.9.40 — setup asks you to accept the VIIY End User License Agreement; it is installed as LICENSE.txt next to the program, together with THIRD-PARTY-NOTICES.txt and a licenses\ folder holding the full texts for Qt, FFmpeg and Spout.
- One copy per machine ⭐ v0.9.40 — launching VIIY while it is already running brings the open window to the front instead of starting a second copy. Two copies would fight over the same outputs, ports and capture devices, and would appear on the network as two masters.
- Build the installer: (1) a Release build; (2) powershell -File tools\build-installer.ps1 (windeployqt → self-contained dist\VIIY → vc_redist → Inno Setup → setup.exe). Requires Inno Setup 6 installed.
- Portable: the dist\VIIY folder is self-contained — just copy it and run VIIY.exe.
- DeckLink: the Blackmagic Desktop Video driver is installed separately (not bundled). NDI, Spout and HAP work out of the box.
VIIY Media Server · manual updated 03.08.2026 for v0.9.45 · English edition. Sections marked ⭐ are recent additions. Newest first: v0.9.44–45 — the ACTION crew screen as a full output (NOW/NEXT, where we are in the show, HOLD, the watchdog, message to crew), INPUT rotation for tilted LED, events importable from an editor's marker export, and F6 for the ACTION tab; v0.9.42–43 — live audio input with a spectrum/waveform analyser, sound-meter and generator effects, flip H/V, the effects library in categories, and the ACTION tab itself; v0.9.38–41 — parameters on the clip, Reset ↺, Copy/Paste Attributes, Relink missing media, Show usages, auto-VIRTUAL fallback, custom test card, AI confirmation gate, SETUP → Effects, the BACKUP identity indicator with SAVE & SYNC, pairing-PIN feedback on the receiver, instant clip delete, SETUP → License with seats for the backup and the render nodes, per-machine binding of outputs and live inputs, the AI build progress bar, and this manual inside the program.
Legal & trademarks
Art-Net™ Designed by and Copyright Artistic Licence Engineering Ltd.
NDI® is a registered trademark of Vizrt NDI AB. VIIY is not a product of NDI and is not affiliated with, sponsored by or endorsed by Vizrt NDI AB; the NDI name is used here only to identify that VIIY is compatible with NDI products.
sACN is implemented as described in ANSI E1.31, published by ESTA. Blackmagic Design, DeckLink and Desktop Video are trademarks of Blackmagic Design Pty Ltd. FFmpeg is a trademark of Fabrice Bellard.
All other product names, logos and brands mentioned in this manual are the property of their respective owners. Where another product is named — for example to say that a keyboard shortcut matches the one in another editor — it is named only to describe compatibility, and implies no affiliation, sponsorship or endorsement.
V:I:I:Y and VIIY are trademarks or pending trademarks of the Licensor. Full third-party notices are installed next to the program as THIRD-PARTY-NOTICES.txt, with the complete license texts in the licenses\ folder.